version v7.2.
For up-to-date documentation, see the
latest version.
Operations guide
21 minute read
Document maturity: DRAFT
| Document reference | Document Name |
|---|---|
| TASD | Technical Architecture and Security Document of SWaaP |
| LLD-BlackDuck | Low level design of Black Duck component |
Introduction
The Black Duck component is part of Software Factory as a Package (SWaaP).
The component is in charge of Software Composition Analysis (SCA), helps with managing the supply chain of software, understanding the third-party components in use and minimizing risks from known vulnerabilities and licensing. BlackDuck is a comprehensive solution for supply chain management, based primarily on source analysis. It also allows users to:
- Scan code and identify open source software that exists in code base.
- View the generated Bill of Materials (BOM) for software projects.
- View vulnerabilities that have been identified in open source components.
- Assess security, license, and operational risk.
Learn more about it in LLD-BlackDuck and in TASD .
Component Deployment and Configuration
Requirements & Pre-requisite
- See LLD-BlackDuck §4.2 prerequisites
- Review known limitations here
Configuration
Setting Helm Values
BlackDuck component is part of SWaaP. For more information, refer to the Getting Started section in the other repository.
Configuring Kubernetes Secrets
The HelmRelease object requires 5 (five) ConfigMap and 2 (two) Secret:
- ConfigMap automatically generated from the files located in the
blackduck/valuesdirectory:
  - kind: ConfigMap
    name: helm-common-values
    valuesKey: swf-chart-default-values.yaml
  - kind: ConfigMap
    name: helm-common-values
    valuesKey: swf-overrides-default-all.yaml
- ConfigMaps the user needs to provide:
  - kind: ConfigMap
    name: helm-sizing-values
    valuesKey: sizing.yaml
  - kind: ConfigMap
    name: helm-platform-values
    valuesKey: platform.yaml
- An optional ConfigMap ([
optional: true][[helmrelease]]) can also be provided. This can be beneficial in certain scenarios, such as when configuring the reference Kustomization resource from the Flux admin repository. This allows the Flux administrator to specify Helm values that they do not necessarily want to add to the reference repository.
  - kind: ConfigMap
    name: helm-extra-values
    valuesKey: values.yaml
    optional: true
- Mandatory secrets the user needs to provide (in order to overwite default cleartext credentials from values.yaml file):
  - kind: Secret
    name: blackduck-database-creds
    valuesKey: db-password
  - kind: Secret
    name: blackduck-user-database-creds
    valuesKey: db-password
Above secrets contain the postgres (the admin) and blackduck_user (the user) PostgreSQL passwords set as secret files.
Note that, based on the Helm values you provide, additional Kubernetes secrets and configmaps may also be required.
Please check the official documentation for further information.
Deployment & Update Procedure
BlackDuck deployments and upgrades are automated using Flux , a GitOps framework. For K8S clusters with linkerd enabled, there’s a well know issue that requires a manual intervention. This is properly documented in the limitations section .
Here’s an example of a release YAML file
apiVersion: helm.toolkit.fluxcd.io/v2beta1
kind: HelmRelease
metadata:
  name: blackduck
spec:
  releaseName: blackduck
  chart:
    spec:
      chart: blackduck
      version: 2025.4.1
      sourceRef:
        kind: HelmRepository
        name: blackduck
  install:
    crds: Skip
    disableWait: true
#    MANDATORY! disableWait flag needs to be set to true.
#    Flux by default waits for a succesfull helm install, but this is conflict with Blackduck documentation securityContext:
#    "You must not use the --wait flag when you install the Helm Chart.
#    --wait waits for all pods to become Ready before marking the Install as done.
#    However the pods will not become Ready until the postgres-init job is run during the Post-Install.
#    Therefore the Install will never finish."
  upgrade:
    crds: Skip
  interval: 10m
  timeout: 20m
  valuesFrom:
    # Default values of the chart. Shall not be modified.
    - kind: ConfigMap
      name: helm-common-values
      valuesKey: swf-chart-default-values.yaml
    # All overrides are here (if not in a more specialized files below)
    - kind: ConfigMap
      name: helm-common-values
      valuesKey: swf-overrides-default-all.yaml
    # Overrides related to the usage of a private registry
    - kind: ConfigMap
      name: helm-images-values
      valuesKey: swf-overrides-var-images.yaml
    # These platform specific Values shall always exist. Even empty.
    - kind: ConfigMap
      name: helm-sizing-values
      valuesKey: sizing.yaml
    - kind: ConfigMap
      name: helm-platform-values
      valuesKey: platform.yaml
    # Following 2 secrets are mandatory in order to overwrite the default values provided in clear text via the values.yaml file inside the helm chart
    - kind: Secret
      name: blackduck-database-creds
      valuesKey: db-password
      targetPath: postgres.adminPassword
      optional: false
    - kind: Secret
      name: blackduck-user-database-creds
      valuesKey: db-password
      targetPath: postgres.userPassword
      optional: false
apiVersion: source.toolkit.fluxcd.io/v1beta2
kind: HelmRepository
metadata:
  name: blackduck
spec:
  interval: 30m
  url: ${helmRepositoryUrl:="https://repo.blackduck.com/cloudnative/"}
Settings
Define mandatory configuration variables and values.
PostgreSQL configuration YAML file, e.g. pg.yaml
| Key | Type | Default | Description |
|---|---|---|---|
| auth.existingSecret | string | db-password | Refers to the name of an existing secret that contains the password for the Blackduck database. |
| auth.secretKeys.adminPasswordKey | string | db-password | Refers to the name of an existing secret that contains the password for the Blackduck database. |
| auth.database | string | blackduck | Specifies the name of the Blackduck database. |
| primary.persistence.size | string | 10Gi | Specifies the desired size of the persistence volume for the primary Blackduck node. |
Blackduck platform setup, installation and deployment YAML file, e.g. platform.yaml
| Key | Type | Default | Description |
|---|---|---|---|
| imagePullSecrets | array | [] | The secrets to use for pulling container images. |
| exposeui | bool | true | Creates NodePort service; Not recommended in production. |
| enableAlert | bool | false | Configure Black Duck to use an Alert instance. |
| alertName | string | "" | Specifies Synopsys Alert release name. |
| alertNamespace | string | "" | Specifies Synopsys Alert namespace. |
IMPORTANT NOTES:
- In case you deploy Blackduck with (
enableAlert:true) and a Synopsys Alert instance is not found in the cluster (or unreachable), the deployment will fail. - BlackDuck helm chart includes a folder “sizes-gen05” that contains files with the recommended sizing, depending on the SPH you need to run. More on this in LLD-BlackDuck § 7.5 scaling.
Functional Configuration
Following the internal pentest findings, it is recommended to consider filtering this specific API
path /api/users/(.*)/assignable-projects, as this potentially exposes sensitive information in
accordance with OWASP AO1:2021 Broken Access Control
Our tests confirmed full mitigation via filtering and there are no other APIs affected by it.
SAML Configuration
- Navigate to Admin > Integrations > External Authentication
- Click Security Assertion Markup Language (SAML), complete the following:
- Select the Enable SAML configuration check box.
- Fill Service Provider Entity ID field with the information for the Black Duck SCA server
in your environment in the format
https://hostwherehostis your Black Duck SCA server. - Select one of the following Identity Provider Metadata:
URLand enter the URL for your identity provider.XML Fileand either drop the file or click in the area shown to open a dialog box from which you can select the XML file.
- Fill External Black Duck SCA URL field. The URL of the Black Duck SCA server.
- Optional settings:
- Enable Group Synchronization
- If this option is enabled, upon login, groups from the Identity Provider (IDP) are created in Black Duck SCA and users will be assigned to those groups. ❗If you set up SAML SSO to support groups, the groups attribute should be enabled and configured in the IdP. This option supersedes the LDAP group-management settings.
- Enable local logout support
- If this option is enabled, after logging out of Black Duck SCA, the IDP’s login page would appear. When local logout support is enabled, SAML requests are sent with ForceAuthn=“true”. Check with the IDP to confirm that this is supported.
- Create user accounts automatically in Black Duck
- If a user logs in using the IdP and the user doesn’t exist in Black Duck, we create a local user in Black Duck SCA’s database if that option is selected.
- Send signed authentication request
- If this option is enabled, it indicates the asserting party’s preference that relying parties should sign the authentication request before sending.
- Enable Group Synchronization
Additional documentation, can be found in the SAML configuration and in the Black Duck SAML integration using Azure AD
TDP related Configuration
There are several things that were requested by our customers and need to be configured manually for the moment.
RBAC Model
Purpose
This section describes the recommended Black Duck RBAC model for all platforms.
Important concepts about Black Duck roles
Black Duck access management can be confusing if you expect a hierarchical model like in some other tools.
Roles are additive
Black Duck roles are additive:
- a user only gets the permissions explicitly assigned,
- assigning one role does not automatically grant another role,
- there is no built-in “higher role includes lower role” logic.
For example:
- a user with Project Manager does not automatically get every other project role,
- if a user needs both Project Viewer and Project Code Scanner, both roles must be assigned.
Roles are not hierarchical
Black Duck roles should not be understood as:
- Viewer < Developer < Admin
This is not how the permission model works.
Instead, each role grants a specific set of capabilities, and these capabilities are combined.
Recommendation on least privilege
Permissions should be assigned according to actual user needs. Avoid using broad global roles when project or project-group roles are sufficient.
Recommanded Role Matrix
| Functional group | Main purpose | Black Duck roles |
|---|---|---|
| [Project] Owner | Manage the project from an operational perspective | Project Viewer; Project Manager |
| [Project] Security Analyst | Review vulnerabilities, manage remediation, review BOM | Project Viewer; Project Code Scanner; BOM Manager; Security Manager |
| [Project] Engineering member / Code Scanner | Run scans, upload SBOMs, access project results, annotate BOM comments and update BOM component custom fields | Project Viewer; Project Code Scanner; BOM Annotator |
| [Project] Group owner | Manage a project group and delegate project-group access | Project Viewer; Project Group Administrator |
| [Project] Service account | Automation account for CI/CD scanning and SBOM upload | Project Viewer; Project Code Scanner |
| [Project] Policy reviewer | Manage OSS Memo related license and policy administration at project level | Project Viewer; Policy Violation Reviewer |
| [Global] OSS Memo manager | Manage OSS Memo related license and policy administration at platform level | License Manager; Policy Manager |
| [Global] Software Factory application admin | Functional administration of the Black Duck service | Global Project Viewer; User Administrator; Global Project Group Administrator; Custom Fields Administrator; Policy Manager; Component Manager; License Manager; Copyright Editor; Global Security Manager |
| [Global] Software Factory system admin | Technical and system-wide administration | User Administrator; Global Project Group Administrator; Custom Fields Administrator; Policy Manager; Component Manager; License Manager; Copyright Editor; Global Notification Viewer; System Administrator; Integration Manager |
Functional roles and expected usage
Owner
This role is intended for the person responsible for the project from an operational perspective.
Typical responsibilities:
- access project information,
- manage project versions,
- manage project-level organization,
- generate reports,
- oversee remediation follow-up depending on platform configuration.
Assigned Black Duck roles:
- Project Viewer
- Project Manager
Security Analyst
This role is intended for users in charge of vulnerability review, remediation handling, and security-related analysis.
Typical responsibilities:
- access project data,
- run scans if needed,
- review and manage the BOM,
- manage vulnerability remediation,
- support security governance activities.
Assigned Black Duck roles:
- Project Viewer
- Project Code Scanner
- BOM Manager
- Security Manager
Engineering member / Code Scanner
This role is intended for development teams and CI/CD technical users.
Typical responsibilities:
- access project data,
- launch scans from pipelines or manually,
- upload SBOMs when needed,
- annotate BOM entries,
- update BOM component custom fields.
Assigned Black Duck roles:
- Project Viewer
- Project Code Scanner
- BOM Annotator
Group owner
This role is intended for users responsible for administration of a project group perimeter.
Typical responsibilities:
- manage project group organization,
- delegate access at project group level.
Assigned Black Duck roles:
- Project Viewer
- Project Group Administrator
Service account
This role is intended for automation, especially CI/CD integrations.
Typical responsibilities:
- launch scans from CI/CD pipelines,
- upload SBOMs,
- retrieve project scan results if required by automation.
Assigned Black Duck roles:
- Project Viewer
- Project Code Scanner
By default, service accounts should not receive permissions to create or manage
projects/project groups.
If an integration requires additional rights, they should be granted explicitly
and only where needed.
Policy reviewer
This role is intended for users managing OSS Memo related administration at project level.
Typical responsibilities:
- manage license status updates,
- maintain policy-related license configuration,
- align Black Duck license settings with the internal OSS Memo process in specific projects.
Assigned Black Duck roles:
- Project Viewer
- Policy Violation Reviewer
OSS Memo manager
This role is intended for users managing OSS Memo related administration at platform level.
Typical responsibilities:
- manage license status updates,
- maintain policy-related license configuration,
- align Black Duck license settings with the internal OSS Memo process.
Assigned Black Duck roles:
- License Manager
- Policy Manager
User use cases covered by the model
The role model is based on the following expected user actions.
| User action | Suggested Black Duck role(s) |
|---|---|
| View project content and reports | Project Viewer |
| Launch a scan from CI/CD or manually | Project Code Scanner |
| Upload an SBOM | Project Code Scanner |
| Manage BOM content | BOM Manager |
| Annotate BOM entries or update BOM component custom fields without broader BOM management permissions | BOM Annotator |
| Update vulnerability remediation | Security Manager |
| Manage project versions and project-level settings | Project Manager |
| Manage a project group | Project Group Administrator |
| Manage OSS Memo related license and policy configuration | License Manager, Policy Manager |
2. Project Groups structure
In this tutorial we will create the Project Groups and Subgroups for each THALES GBU and associated Business Line. Prerequisites:
- Have access to a new BlackDuck instance
- Have Software Factory system admin role
Creating a group
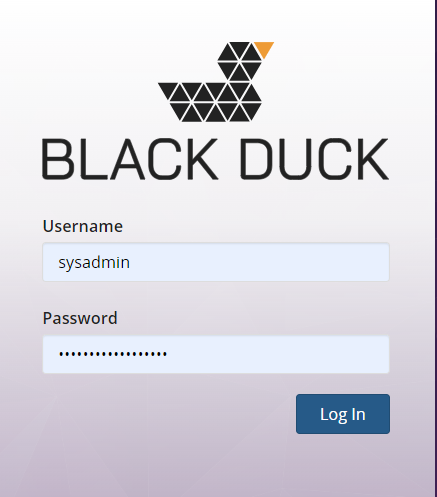
- Open a browser and navigate to BlackDuck WebApp

- Log in using a user that can create project groups (Global Project Group Administrator)
- Select the Manage menu option in the left of the BlackDuck WebApp

- Select the Project Groups menu option in the Manage Menu

- The project group Management page should open,
containing the default root project group “Black Duck Project Groups”
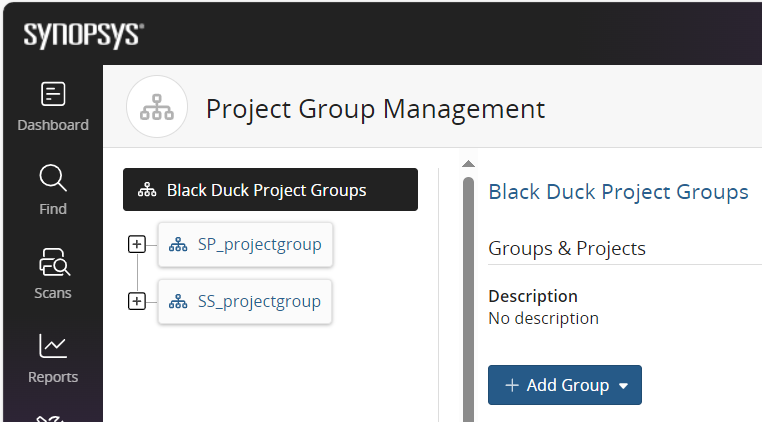
- Select the default project group “Black Duck Project Groups” by selecting it
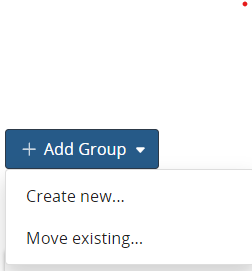
- In the center of the screen select the Add Group button then select “Create New” option
- Add a Name and description for the new project group
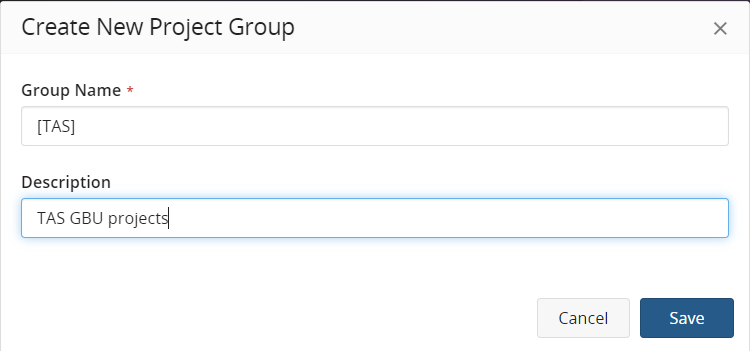
- Save the new project group by selecting Save
- The new project group should appear in the Group list on the left under Black Duck Project Groups
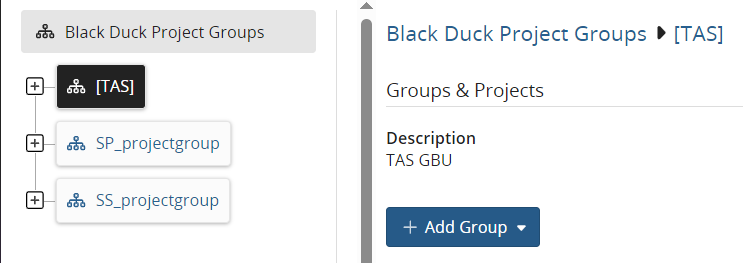
We have successfully created a new project group for a GBU
Creating a subgroup
- Navigate to Project Group Management page in Black Duck
- From the project group list in the left ( under Black Duck Project Groups) select the parent group
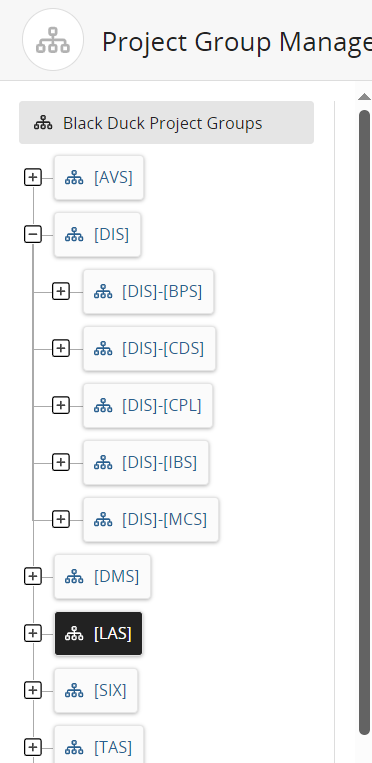
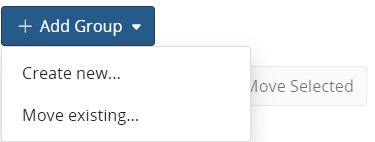
- Select Add Group button then choose New Group. The pictures bellow show the Add Group Button and
New Group option for the “[LAS]” parent group
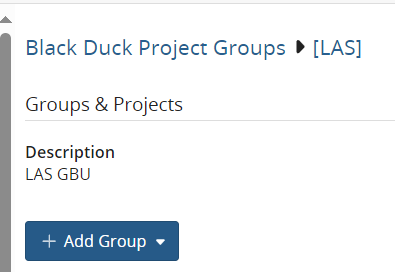
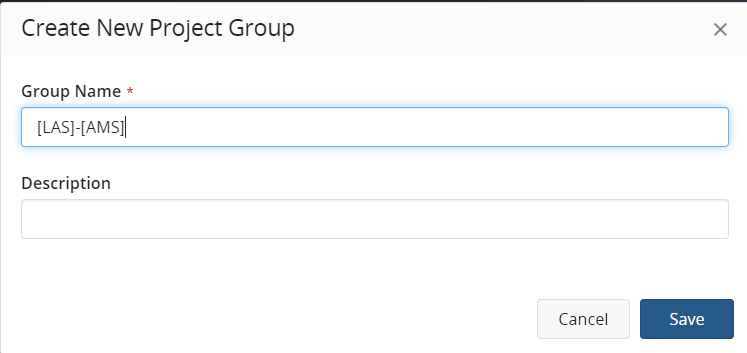
- In the new group form fill in the Name and Description (optional) for the subgroup we want to
create and select Save. Example shows creation of subgroup [LAS]-[AMS] as a child of [LAS] project
group
- After saving the new subgroup should appear in the middle panel of the Group Management page

We have successfully created a Subgroup for a BL inside a GBU BlackDuck group.
Create all GBU groups and BL subgroups
Using Project Groups and Subgroups we will need to create the structure for ALL GBUs and contained BLs.
Below are the GBUs ( Bold text / no indent ) and the contained BLs (indented under each GBU)
- [AVS]
- [AVS]-[AEC]
- [AVS]-[AGS]
- [AVS]-[FLX]
- [AVS]-[IFE]
- [AVS]-[MIS]
- [AVS]-[T&S]
- [AVS]-[Operations]
- [TAS]
- [TAS]-[OEN]
- [TAS]-[Telecom]
- [DIS]
- [DIS]-[BPS]
- [DIS]-[CDS]
- [DIS]-[CPL]
- [DIS]-[IBS]
- [DIS]-[MCS]
- [DMS]
- [DMS]-[AWS]
- [DMS]-[ECS]
- [DMS]-[ISR]
- [DMS]-[UWS]
- [SIX]
- [SIX]-[CIS]
- [SIX]-[NIS]
- [SIX]-[PRS]
- [SIX]-[RCP]
- [SIX]-[SCT]
- [LAS]
- [LAS]-[AMS]
- [LAS]-[IAS]
- [LAS]-[OME]
- [LAS]-[SRA]
- [LAS]-[VTS]
- [OFF-GBU]
References
Black Duck Project Groups Basics
Black Duck documentation: Creating a Project Group
3. Update Licenses as per OSS License Memo
In this tutorial we will mark Black Duck licenses to match the approved Thales [OSS Memo](OSS Memo). The purpose is to mark:
- Licenses with
License Type=Permissivein the [OSS Memo] asApproved - Licenses with
License Type=Strong Copyleftin the [OSS Memo] asRejected
Prerequisites
- accesible instance of Black Duck
- a user having the Software Factory system admin role
Marking licenses
- Navigate to Black Duck webapp login
- Log into Black Duck using a user having Software Factory system admin role
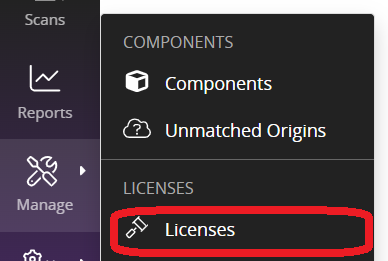
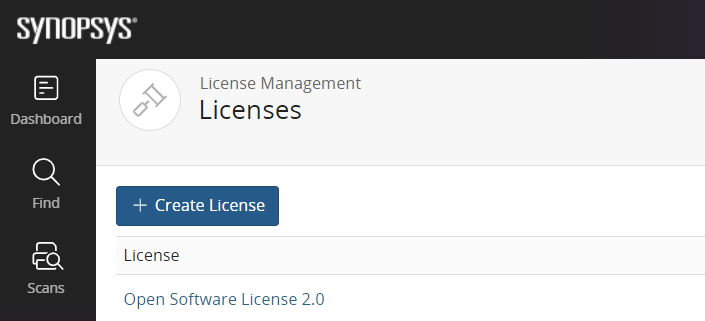
- Select Manage then select Licenses from the menu to Open the License Management screen
- For each license present the [OSS Memo]
Find the license by entering the License Name in the Filter licenses… input field
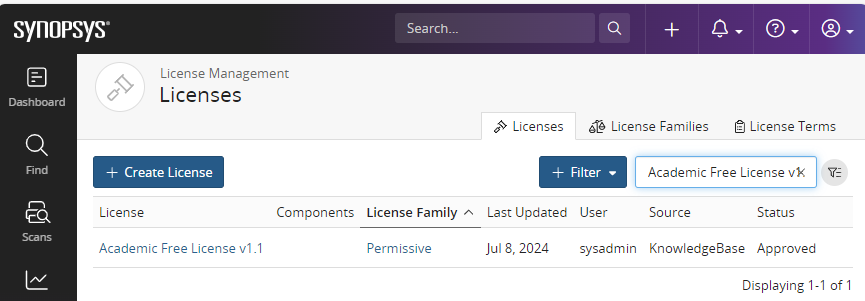
In the Licensees list select the name in the License column to edit the license info
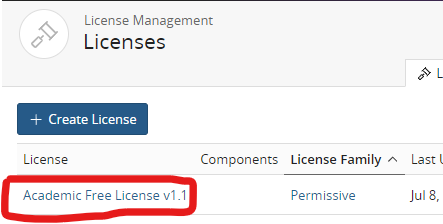
Mark the license according to the [OSS Memo]:
IFthe License Type in the [OSS Memo] is Permissive
set the license’s Status field to Approved and select Save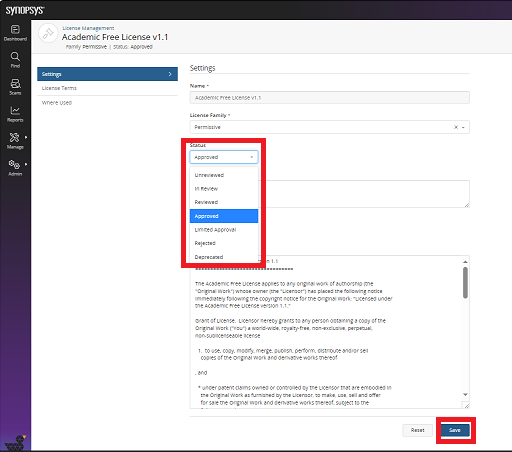
IFthe License Type in the [OSS Memo] is Strong Copyleft
set the license’s Status field to Rejected and select Save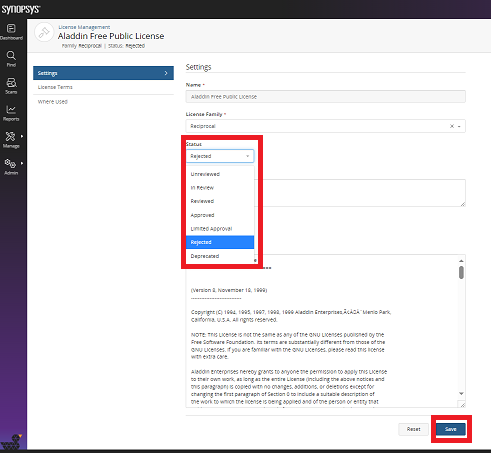
For all other values in License Type column in the [OSS Memo] do nothing (leave existing status Unreviewed)
References
4. Custom Fields
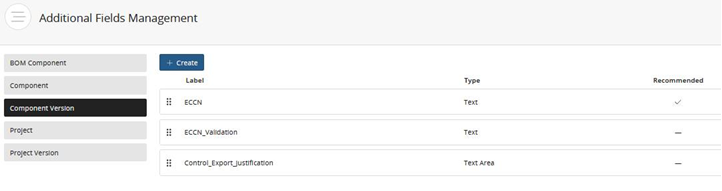
In this tutorial we will create custom component version fields for TAS.
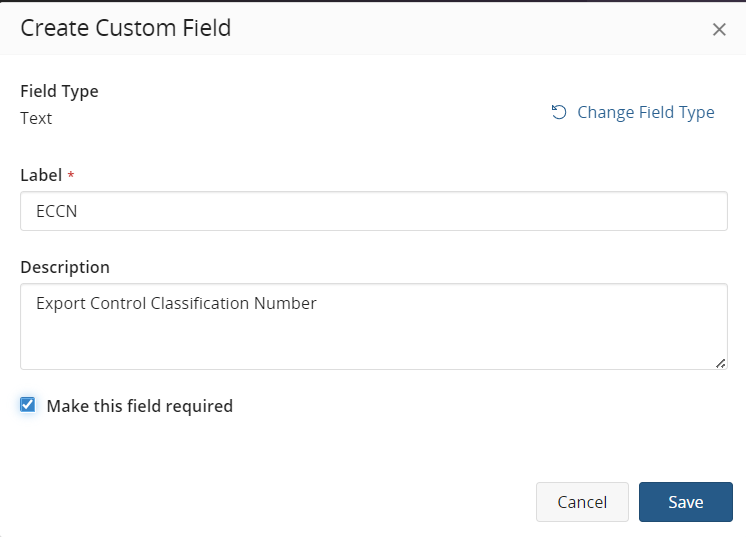
- ECCN = Export Control Classification Number
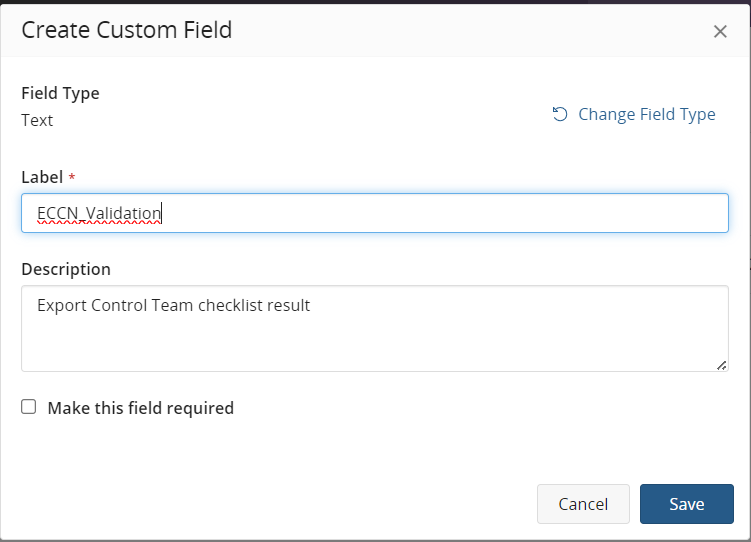
- ECCN_Validation = Export Control Team checklist result
- Control_Export_Justification = Details of the Export Control Team checklist result
Create field ECCN
- Navigate to Black Duck portal
- Log in to Black Duck using user with Software Factory system admin role
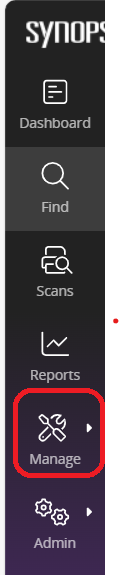
- Select the Manage menu on the left of the screen
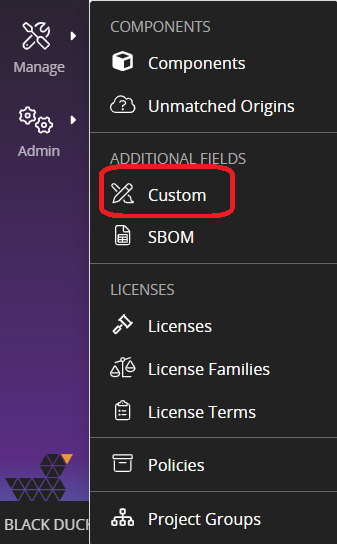
- In the Manage menu select the Custom menu option from section Additional Fields
- In the Additional Fields Management screen select Component Version
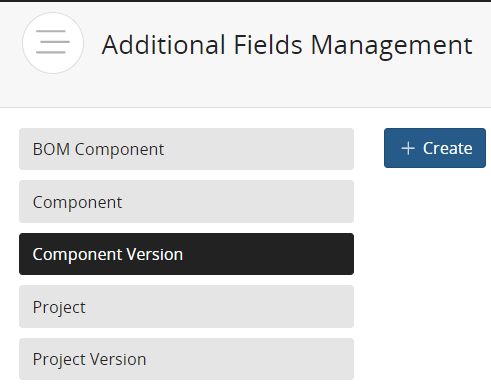
- Select the Create button

- Select custom field type (Text for ECCN)
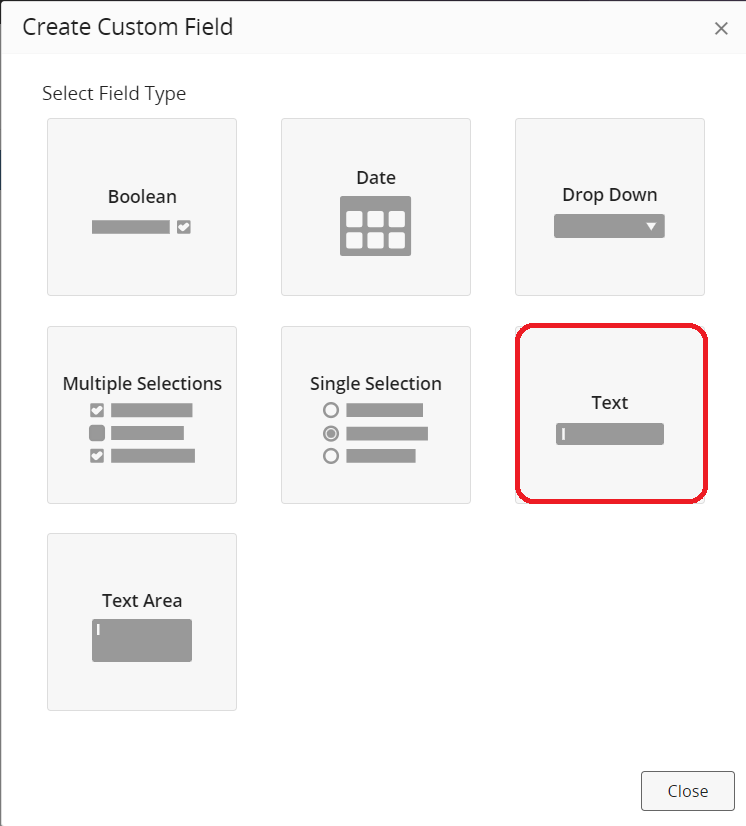
- Enter field Name (ECCN), Description (Export Control Classification Number)
and check Make this field re…
- Select Save
- Custom Field ECCN should appear in the list of Custom Fields
- Make new ECCN field Active by selecting Active toggle button.
A popup message will inform that the field is now Active
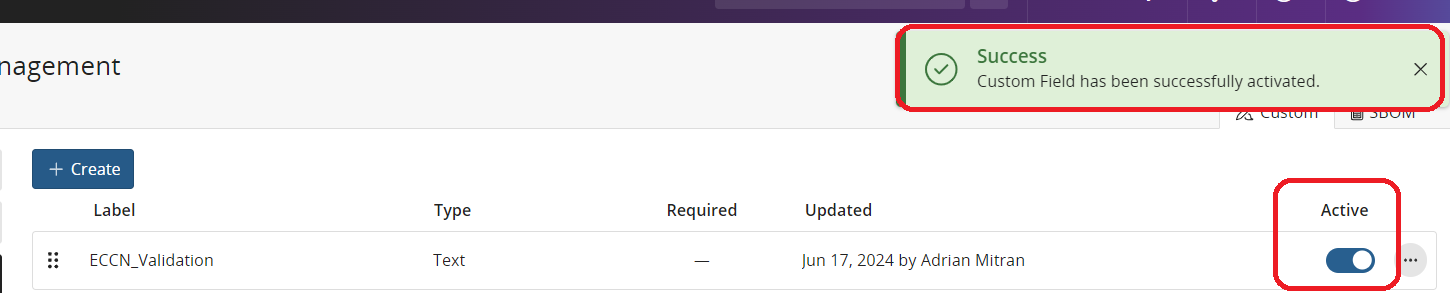
Create ECCN_Validation
Navigate to Additional Fields Management page and select Create (steps 1-6 from ECCN creation above)
Choose field type Text for ECCN_Validation field
Fill in Name (ECCN_Validation), Description (Export Control Team checklist result). Leave checkbox Make this field re…
Select Save
Make newly created field ECCN_Validation Active

Create Control_Export_Justification
Control_Export_Justification = Details of the Export Control Team checklist result
- Navigate to Additional Fields Management page and select Create (steps 1-6 from ECCN creation above)
- Choose field type Text Area for Control_Export_Justification field
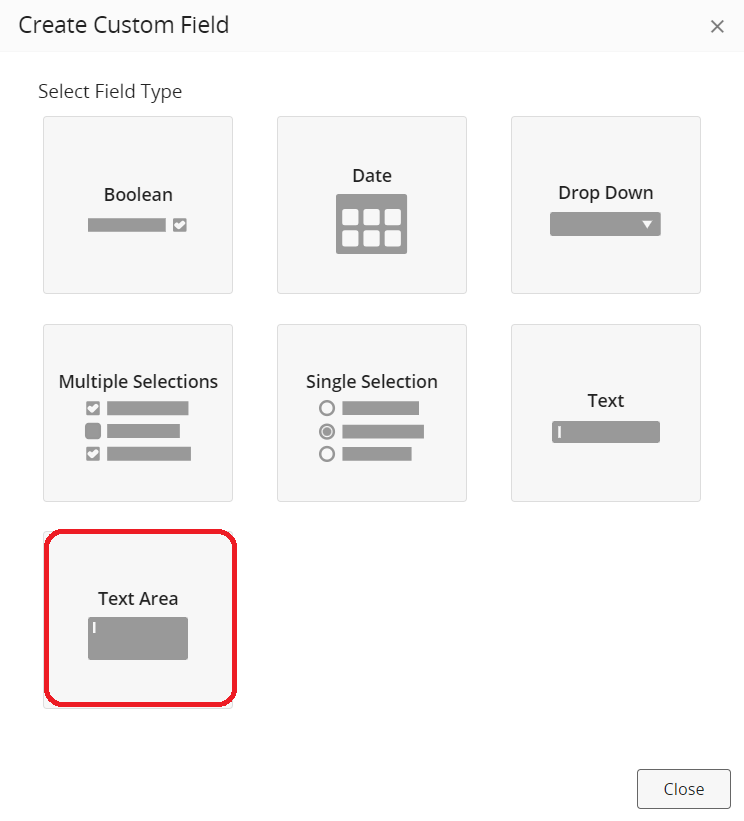
- Fill in Name (Control_Export_Justification), Description
(Details of the Export Control Team checklist result). Leave checkbox Make this field re…
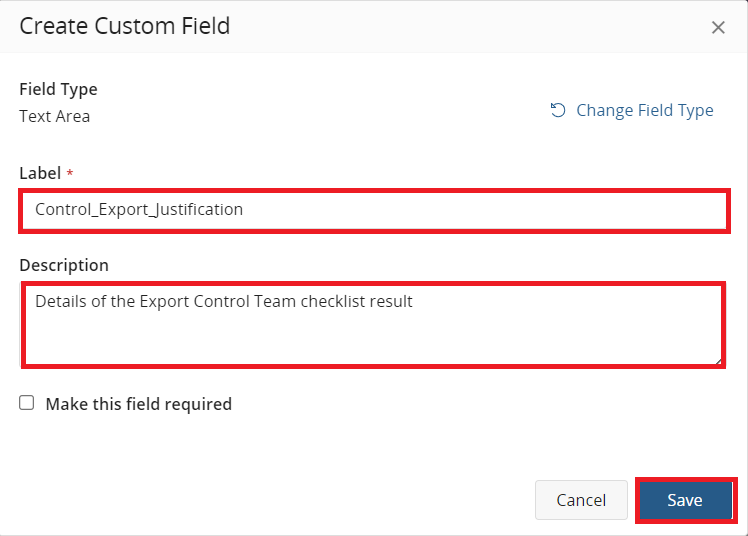
- Select Save
- Make newly created field Control_Export_Justification Active
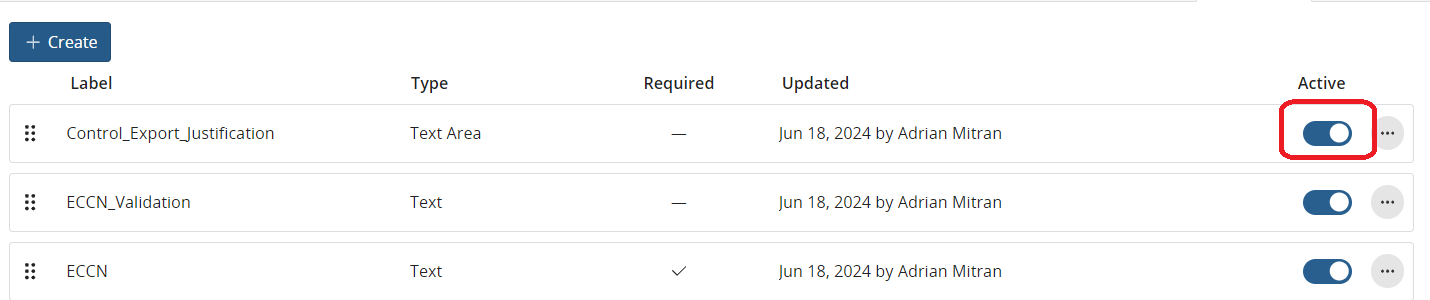
We have finished creating the custom fields for TAS.
Black Duck documentation: Creating a custom field
5. TAS and AVS Policies
AVS Policy Rule: Critical/High CVE detected in a product in operation
- Navigate to Black Duck portal
- Log in to Black Duck using a user that has the Software Factory system admin role
- In the main BlackDuck screen select Manage to open the Manage menu then select Policies
to open the Policy Management dashboard
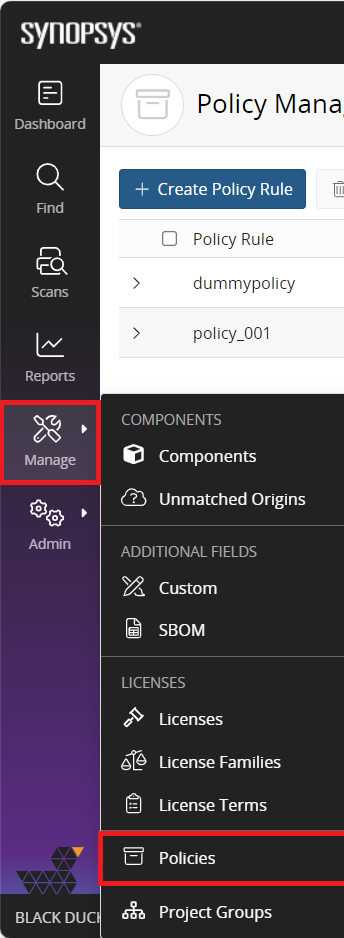
- In the Policy Management dashboard select Create Policy Rule
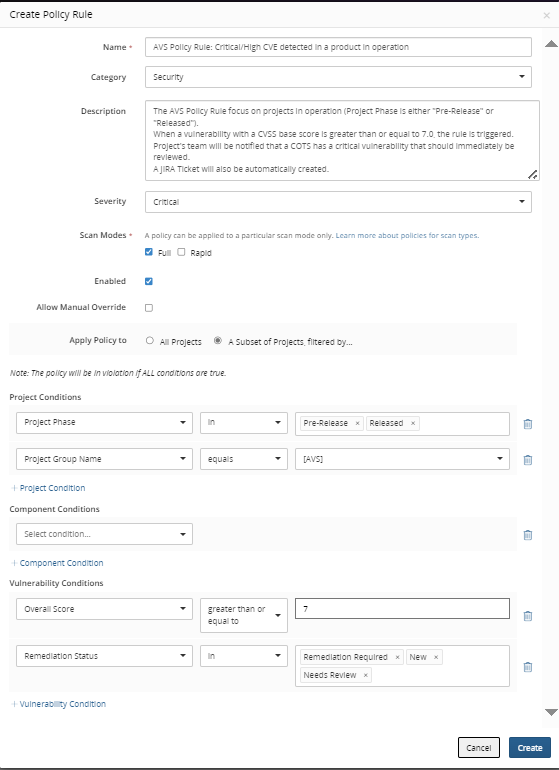
- Fill in the details for the AVS Policy Rule: Critical/High CVE detected in a product in operation
- Name: AVS Policy Rule: Critical/High CVE detected in a product in operation
- Category: Security
- Description: The AVS Policy Rule focus on projects in operation (Project Phase is either “Pre-Release” or “Released”). When a vulnerability with a CVSS base score is greater than or equal to 7.0, the rule is triggered. Project’s team will be notified that a COTS has a critical vulnerability that should immediately be reviewed. A JIRA Ticket will also be automatically created.
- Severity: Critical
- Scan Modes:
- Full
- Enabled: checked (true)
- Allow manual override: unchecked (false)
- Apply policy to: A Subset of Projects filtered by…
- Project Conditions:
- Project Phase IN Pre-Release | Released
- Project Group Name EQUALS [AVS]
- Vulnerability Conditions:
- Overall Score greater than or equal to 7,0
- Remediation Status IN Remediation Required | New | Needs Review
- Select Create
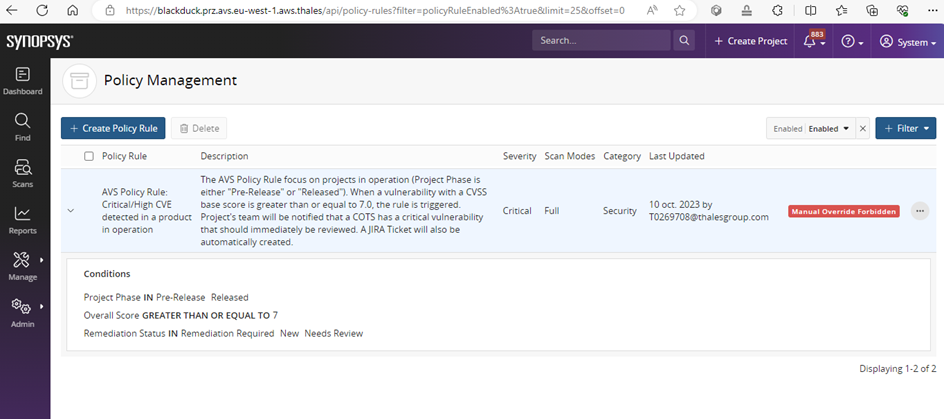
- The newly created AVS Policy Rule: Critical/High CVE detected in a product in operation
should appear in the policy list
TAS-ExportControlPolicy
- Navigate to Black Duck portal
- Log in to Black Duck using a user that has the Software Factory system admin role
- In the main BlackDuck screen select Manage to open the Manage menu then select Policies
to open the Policy Management dashboard
- In the Policy Management dashboard select Create Policy Rule
- Fill in the details for the TAS-ExportControlPolicy
- Name: TAS-ExportControlPolicy
- Category: Operational
- Description: Export Control information is an information mandatory. The policy is Major because the in formation is important but it is not a blocker as you can work on your BOM without
- Severity: Major
- Scan Modes:
- Full
- Rapid
- Enabled: checked (true)
- Allow manual override: checked (true)
- Apply policy to: A Subset of Projects filtered by…
- Project Conditions:
- Project Group Name EQUALS [TAS]
- Component Conditions:
- ECCN matches TO_BE_REVIEWED
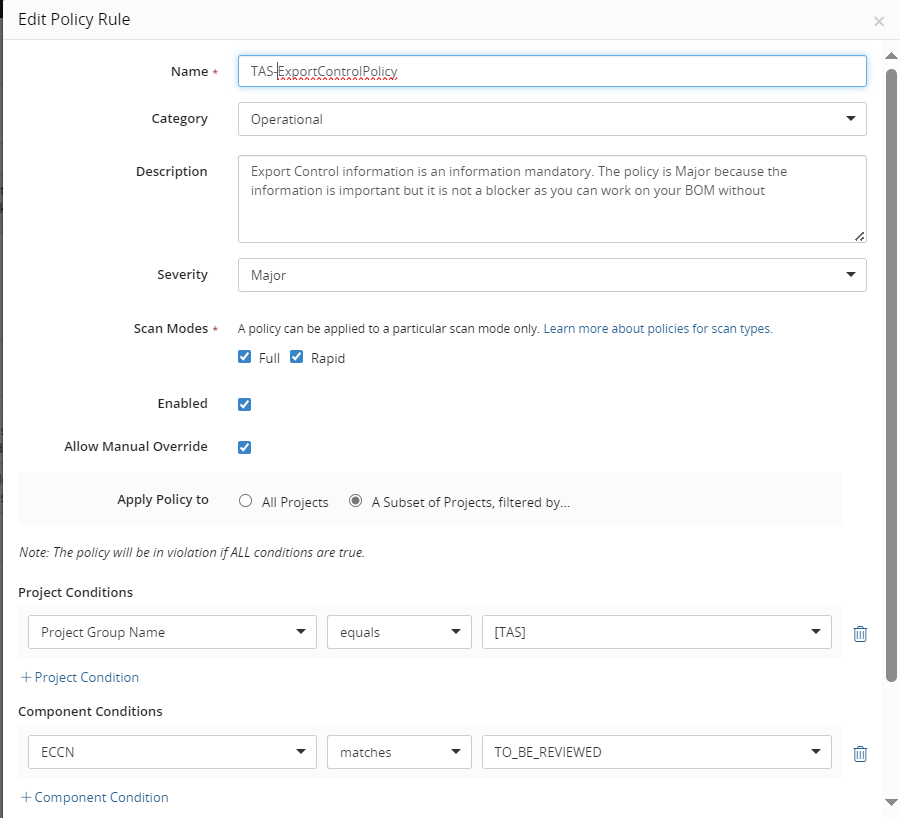
- ECCN matches TO_BE_REVIEWED
- Select Create
- The newly created TAS-ExportControlPolicy should appear in the policy list

TAS-DeprecatedComponents
- Log in to BlackDuck using a user that has the Policy Manager role and navigate to Policy Management dashboard (steps 1-4 from above)
- Fill in the details for TAS-DeprecatedComponents policy
- Name: TAS-DeprecatedComponents
- Category: Operational
- Description:
- Severity: Blocker
- Scan Modes:
- Full
- Rapid
- Enabled: checked (true)
- Allow manual override: unchecked (false)
- Apply policy to: A Subset of Projects filtered by…
- Project Conditions:
- Project Group Name EQUALS [TAS]
- Component Conditions:
- Component Version Approval Status EQUALS Deprecated
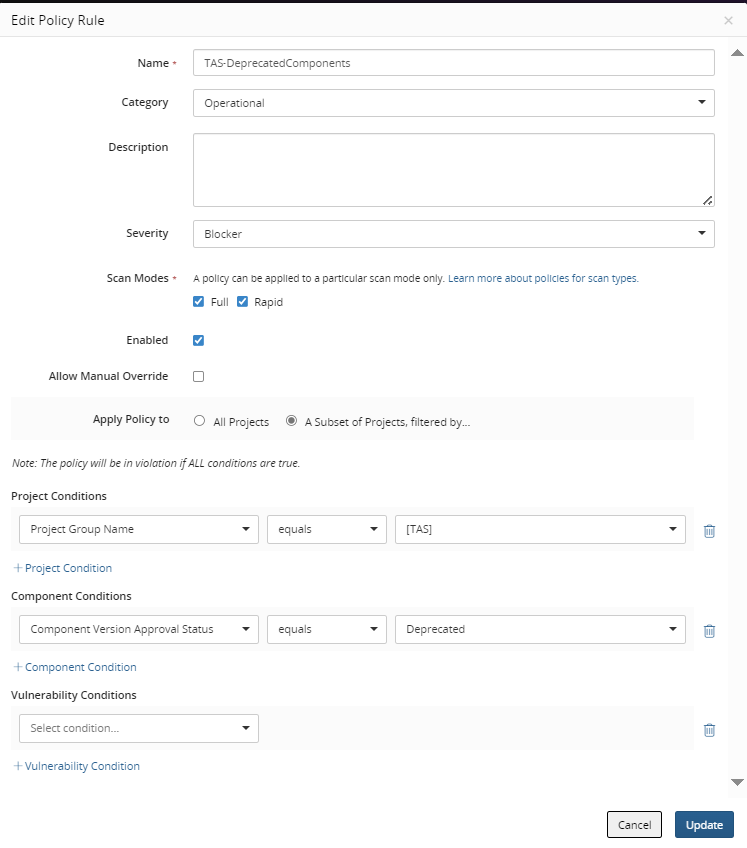
- Component Version Approval Status EQUALS Deprecated
- Select Create
- TAS-DeprecatedComponents policy should appear in the policy list

TAS-OSS.Memo.20240422.Blacklist
- In the Policy Management dashboard select Create Policy Rule
- Fill in the details for TAS-OSS.Memo.20240422.Blacklist in the policy creation form
TAS-OSS.Memo.20240422.Blacklist policy
- Name: TAS-OSS.Memo.20240422.Blacklist
- Category: License
- Description:
OSS Memo Wiki Except “ITU-T SOFTWARE TOOLS’ GENERAL PUBLIC LICENSE” not in Blackduck - Severity: Blocker
- Scan Modes:
- Full
- Rapid
- Enabled: checked (true)
- Allow manual override: checked (true)
- Apply policy to: A Subset of Projects filtered by…
- Project Conditions:
- Project Group Name EQUALS [TAS]
- Component Conditions:
- Component Usage NOT EQUAL TO Dev. Tool / Excluded
Select +Component Condition to add another Component condition in the policy creation form

- License Status (Declared) EQUALS Rejected
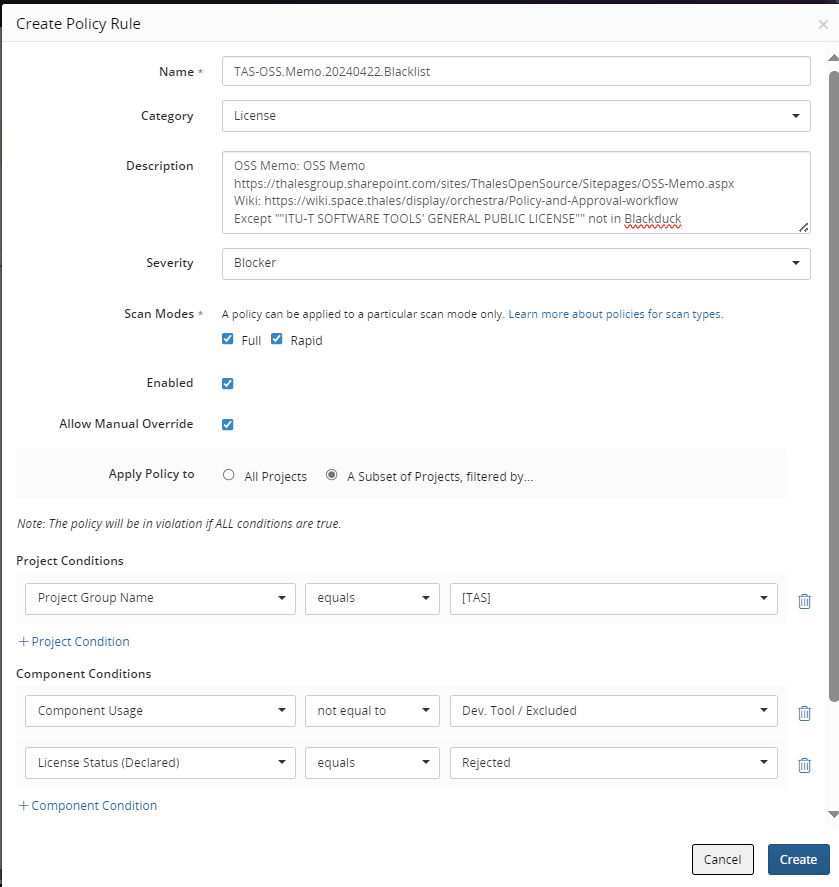
- Component Usage NOT EQUAL TO Dev. Tool / Excluded
Select +Component Condition to add another Component condition in the policy creation form
- Select Create
- TAS-OSS.Memo.20240422.Blacklist policy should appear in the policy list

TAS-OSS.Memo.20240422.WhiteList
- In the Policy Management dashboard select Create Policy Rule
- Fill in the details for TAS-OSS.Memo.20240422.WhiteList in the policy creation form
TAS-OSS.Memo.20240422.WhiteList policy
- Name: TAS-OSS.Memo.20240422.WhiteList
- Category: License
- Description:
OSS Memo Wiki Except ““PCRE2 License”” not in Blackduck - Severity: Blocker
- Scan Modes:
- Full
- Rapid
- Enabled: checked (true)
- Allow manual override: unchecked (false)
- Apply policy to: A Subset of Projects filtered by…
- Project Conditions:
- Project Group Name EQUALS [TAS]
- Component Conditions:
- Review status EQUALS Not Reviewed
- Select +Component Condition to add another Component condition
in the policy creation form
- Select +Component Condition to add another Component condition
in the policy creation form
- Component Usage NOT EQUAL TO Dev. Tool / Excluded
- Select +Component Condition to add another Component condition
in the policy creation form
- Select +Component Condition to add another Component condition
in the policy creation form
- License Status (Declared) NOT EQUAL TO Approved
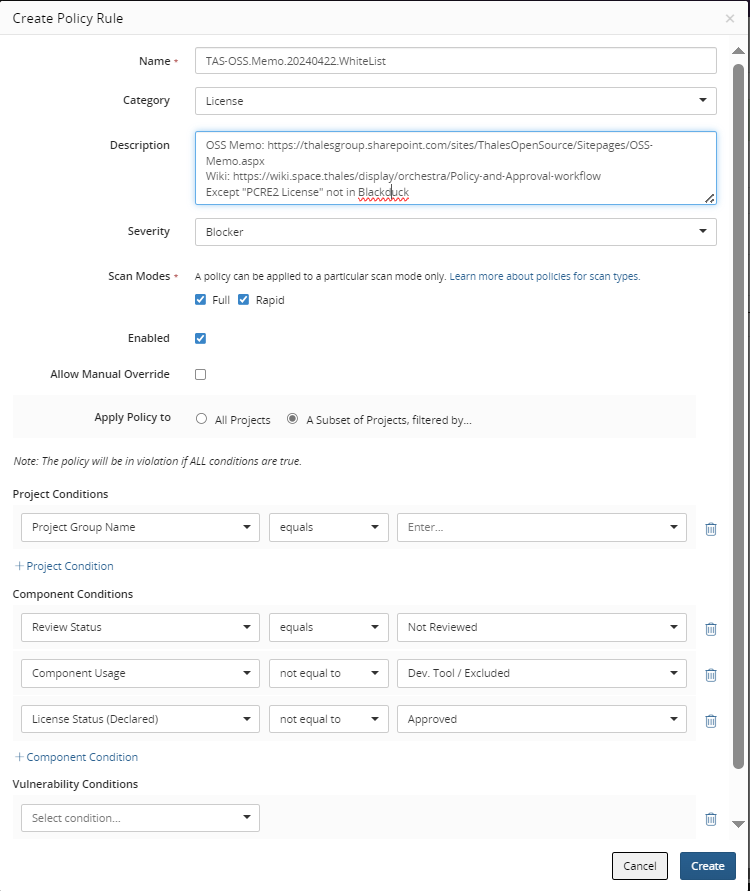
- Review status EQUALS Not Reviewed
- Select Create
- TAS-OSS.Memo.20240422.WhiteList policy should appear in the policy list

TAS-VulnerabilityScorePolicy
- In the Policy Management dashboard select Create Policy Rule
- Fill in the details for TAS-VulnerabilityScorePolicy in the policy creation form
TAS-OSS.Memo.20240422.Blacklist policy
- Name: TAS-VulnerabilityScorePolicy
- Category: Security
- Description:
- Severity: Blocker
- Scan Modes:
- Full
- Rapid
- Enabled: checked (true)
- Allow manual override: unchecked (false)
- Apply policy to: A Subset of Projects filtered by…
- Project Conditions:
- Project Group Name EQUALS [TAS]
- Vulnerability Conditions:
- Overall Score GREATER THAN 6
- Select +Vulnerability Condition to add another vulnerability condition
in the policy creation form

- Select +Vulnerability Condition to add another vulnerability condition
in the policy creation form
- Remediation Status NOT EQUAL TO Ignored
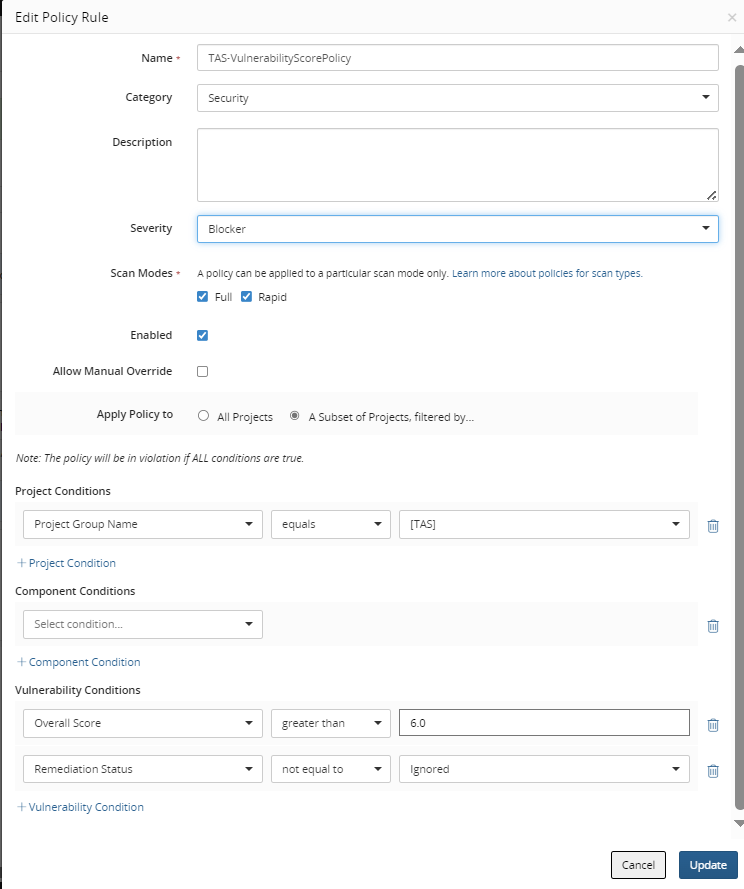
- Overall Score GREATER THAN 6
- Select Create
- TAS-VulnerabilityScorePolicy policy should appear in the policy list

In the end you should have the 5 TAS policies defined in the Policy Management dashboard
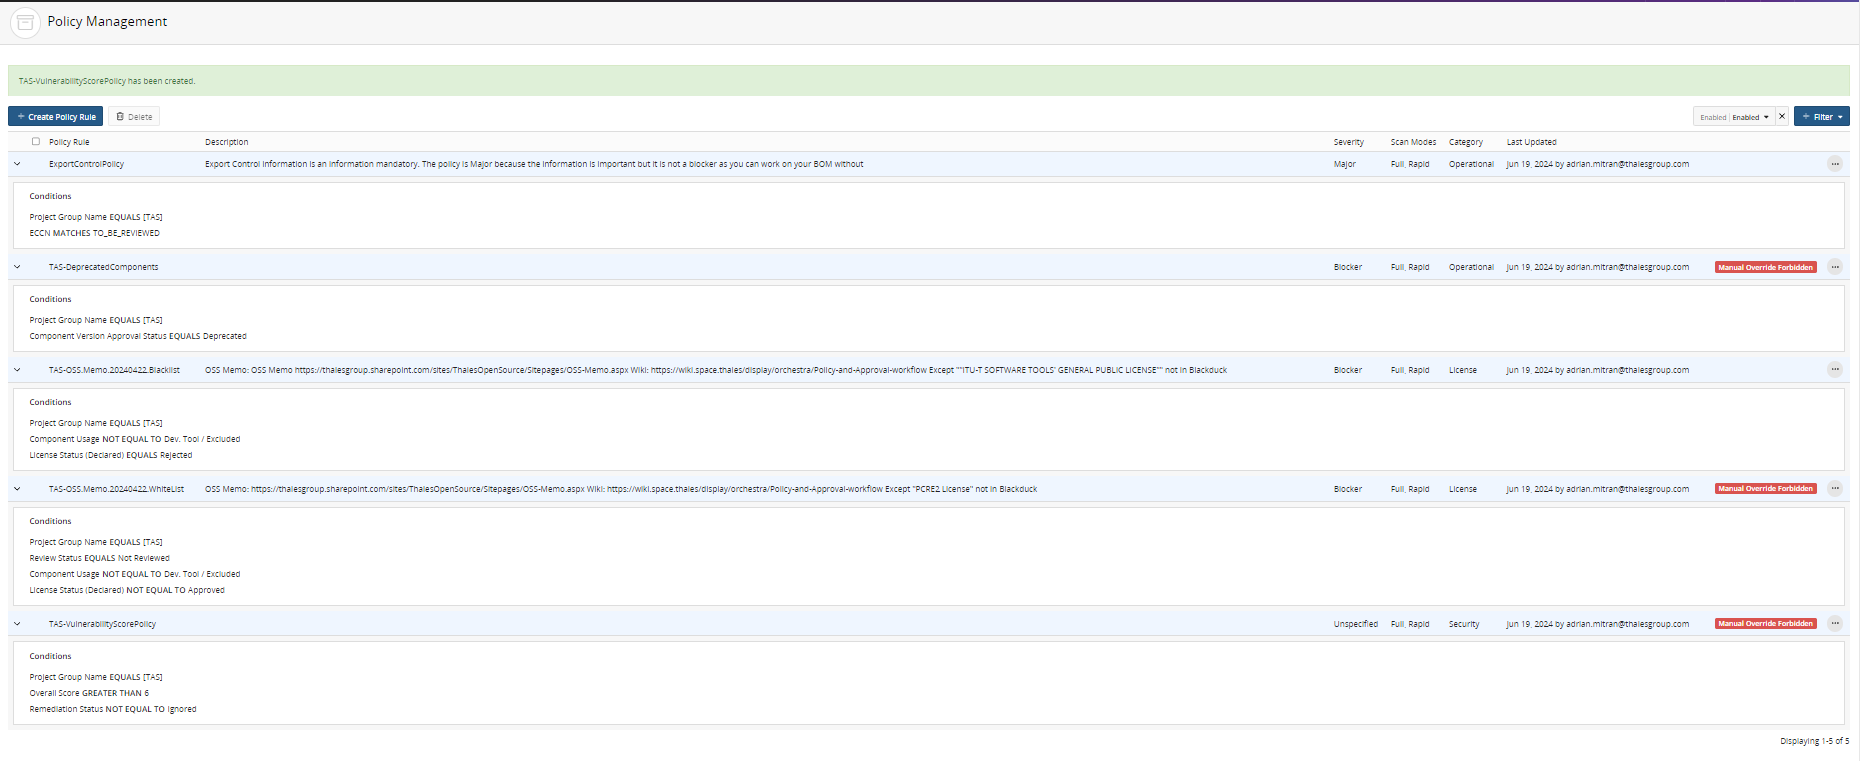
Black Duck documentation: Creating a policy rule
Logging
This chapter describes details for configuring and accessing:
- Logs from the UI
- System logs
- Console logs
Accesing logs from the UI
Black Duck’s server-side logging is designed to help administrators download and review system logs and heatmap data for troubleshooting.
Administrators can download zipped log bundles directly from the UI by navigating to Admin → System Information. Choose one of the available options:
- Logs for Last 2 Days (.zip)
- Logs for Last 14 Days (.zip)
These logs are useful when diagnosing issues or providing data to Synopsys Customer Support.
Heatmap data provides trend information about terminal scan behavior. Administrators can download heatmap data for offline analysis. it can be downloaded also from System Information section.
The downloaded heatmap CSV can be used to build pivot tables and visualize scanning trends.
Alternative Log Retrieval (CLI-Based)
If logs cannot be downloaded from the UI, Black Duck provides guidance for retrieving logs from the
command line. In Kubernetes one you can get them from the logstash pod with something like this:
kubectl -n blackduck exec -it $(kubectl -n blackduck get pods --no-headers \
-o custom-columns=":metadata.name" --selector=component=webapp-logstash) -c logstash -- /bin/bash
tar -czvf /tmp/logs.tar.gz /var/lib/logstash/data/
kubectl -n blackduck cp $(kubectl -n blackduck get pods --no-headers \
-o custom-columns=":metadata.name" --selector=component=webapp-logstash):/tmp/logs.tar.gz \
logs.tar.gz -c logstash
Console logs
Blackduck don’t offer specific guidelines on retrieving console logs, thus it can be collected via industry standard methods.
Monitoring
Monitor BlackDuck Microservices
BlackDuck offers a diverse and robust set of monitoring metrics that provide deep observability across infrastructure, application workflows, binary analysis, and security governance. Whether using built-in hosted monitoring, Prometheus + Grafana for self-managed deployments, or reporting-focused tools like blackduck-metrics, these metrics enable teams to:
- Detect performance degradation early
- Maintain operational stability
- Support compliance audits
- Improve scan throughput
- Optimize system scaling
Core Metrics Monitored in BlackDuck Hosted Instances
Synopsys collects and stores multiple operational metrics for each hosted Black Duck instance. These metrics support issue triage, performance troubleshooting, and automated alerting.
Daily Scans Tracks the number of scans performed daily. Useful for analyzing behavior changes, detecting anomalies, and correlating customer activity with system performance.
Job Instances Monitors scan-related job execution across the system, useful when investigating failures or unusual processing times.
Database CPU Utilization High database CPU load triggers alerts and often indicates customer operations that heavily impact query execution, potentially requiring scaling or rebooting.
Pod Readiness Tracks whether Kubernetes pods are running but not ready to process requests. If readiness takes too long, automated alerts are generated to investigate potential outages.
Application-Level Metrics (Black Duck Metrics API Tool)
The blackduck-metrics utility extracts organization-wide usage metrics via the Black Duck REST API. These metrics help diagnose risk, usage, adoption, and workload trends.
Black Duck Metrics connects to your Black Duck instance and extracts data from the system using REST API to CSV files of raw data, and an XLSX (Excel) file containing graphs. This data can be useful to help report on your usage and spot anomalies.
The utility extracts information from the entire system (provided the correct permission is granted) and extracts users, scans, policies, projects and versions including metadata such as the quantity of each level of vulnerability, e.g. the number of critical vulns in each version. It does NOT extract the actual components that are included in projects or the vulnerabilities associated. When you run the tool you can specify if you would like project, version and user names to be anonymised in the output, however this does make it harder to identify projects.
This utility is designed to help review Black Duck usage but should be used only periodically.
Reporting Database
Reporting schemas in the PostgreSQL database, bds_hub, provide access to Black Duck data for
reporting purposes. Use any reporting tool that supports JDBC connections, such as Jasper Reports,
to access the data.
ℹ️ Extras: Since Blackduck don’t provide clear documentation on BlackDuck monitoring, please follow-up on bellow resources: