version v7.2.
For up-to-date documentation, see the
latest version.
Artifactory projects
5 minute read
Artifactory’s project feature allows you to create isolated environments for better collaboration among team members.
You can find information on how to manage projects and migration workflows on this page.
Create and Manage Projects
Here’s how you can set up and work with projects in Artifactory:
Create a New Project
📩 To create a new project in Artifactory, request the creation of a new project from your Artifactory platform administrator.
Administrator Instructions
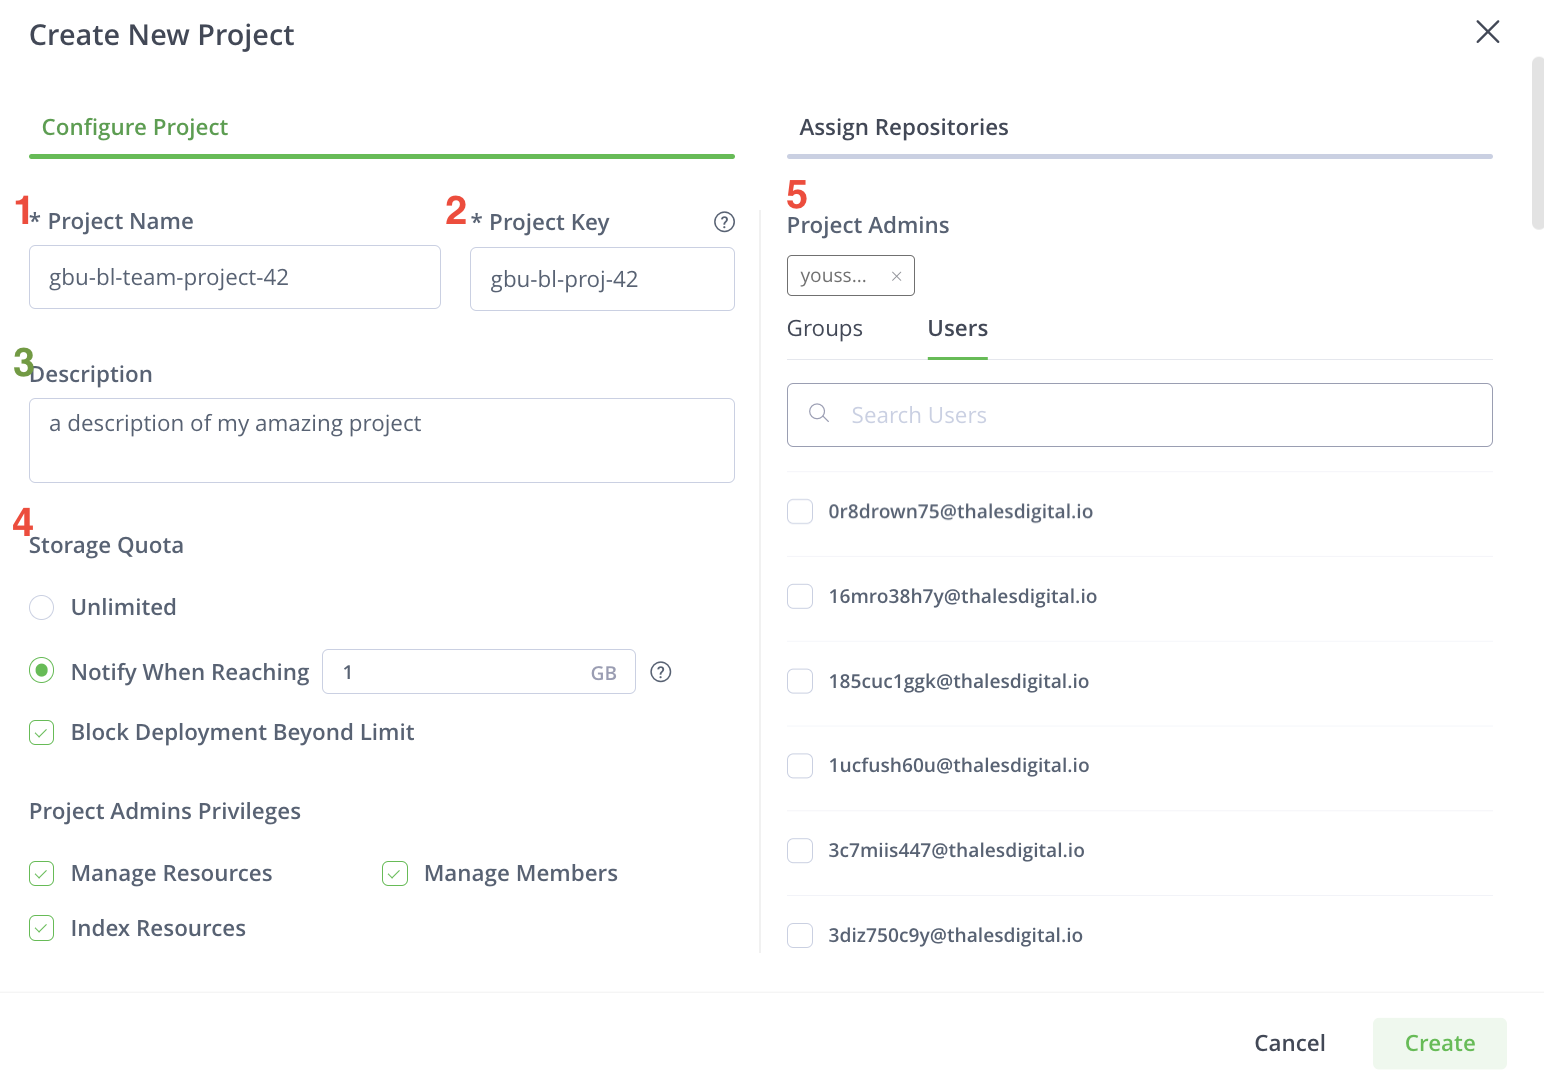
To create a new project, follow these steps:
- Go to the
Projectstab, next to Application. - Select the “New Project” button.
- Fill in the details as requested:
- Project Name: A descriptive name that reflects the GBU, teams, and project.
- Project Key: A unique identifier that will prefix all resources within the project.
- Description: Provide a brief description of the project (optional).
- Storage Quota Limit: Specify the maximum amount of storage space allocated for the project
- activate
Block Deployment Beyond this Limit. - Assign Project Administrators: This should include at least the requester.
- Select
Createto finalize the creation of the project.
Create Project Repositories
This action can be performed by the project administrator without requiring a platform administrator.
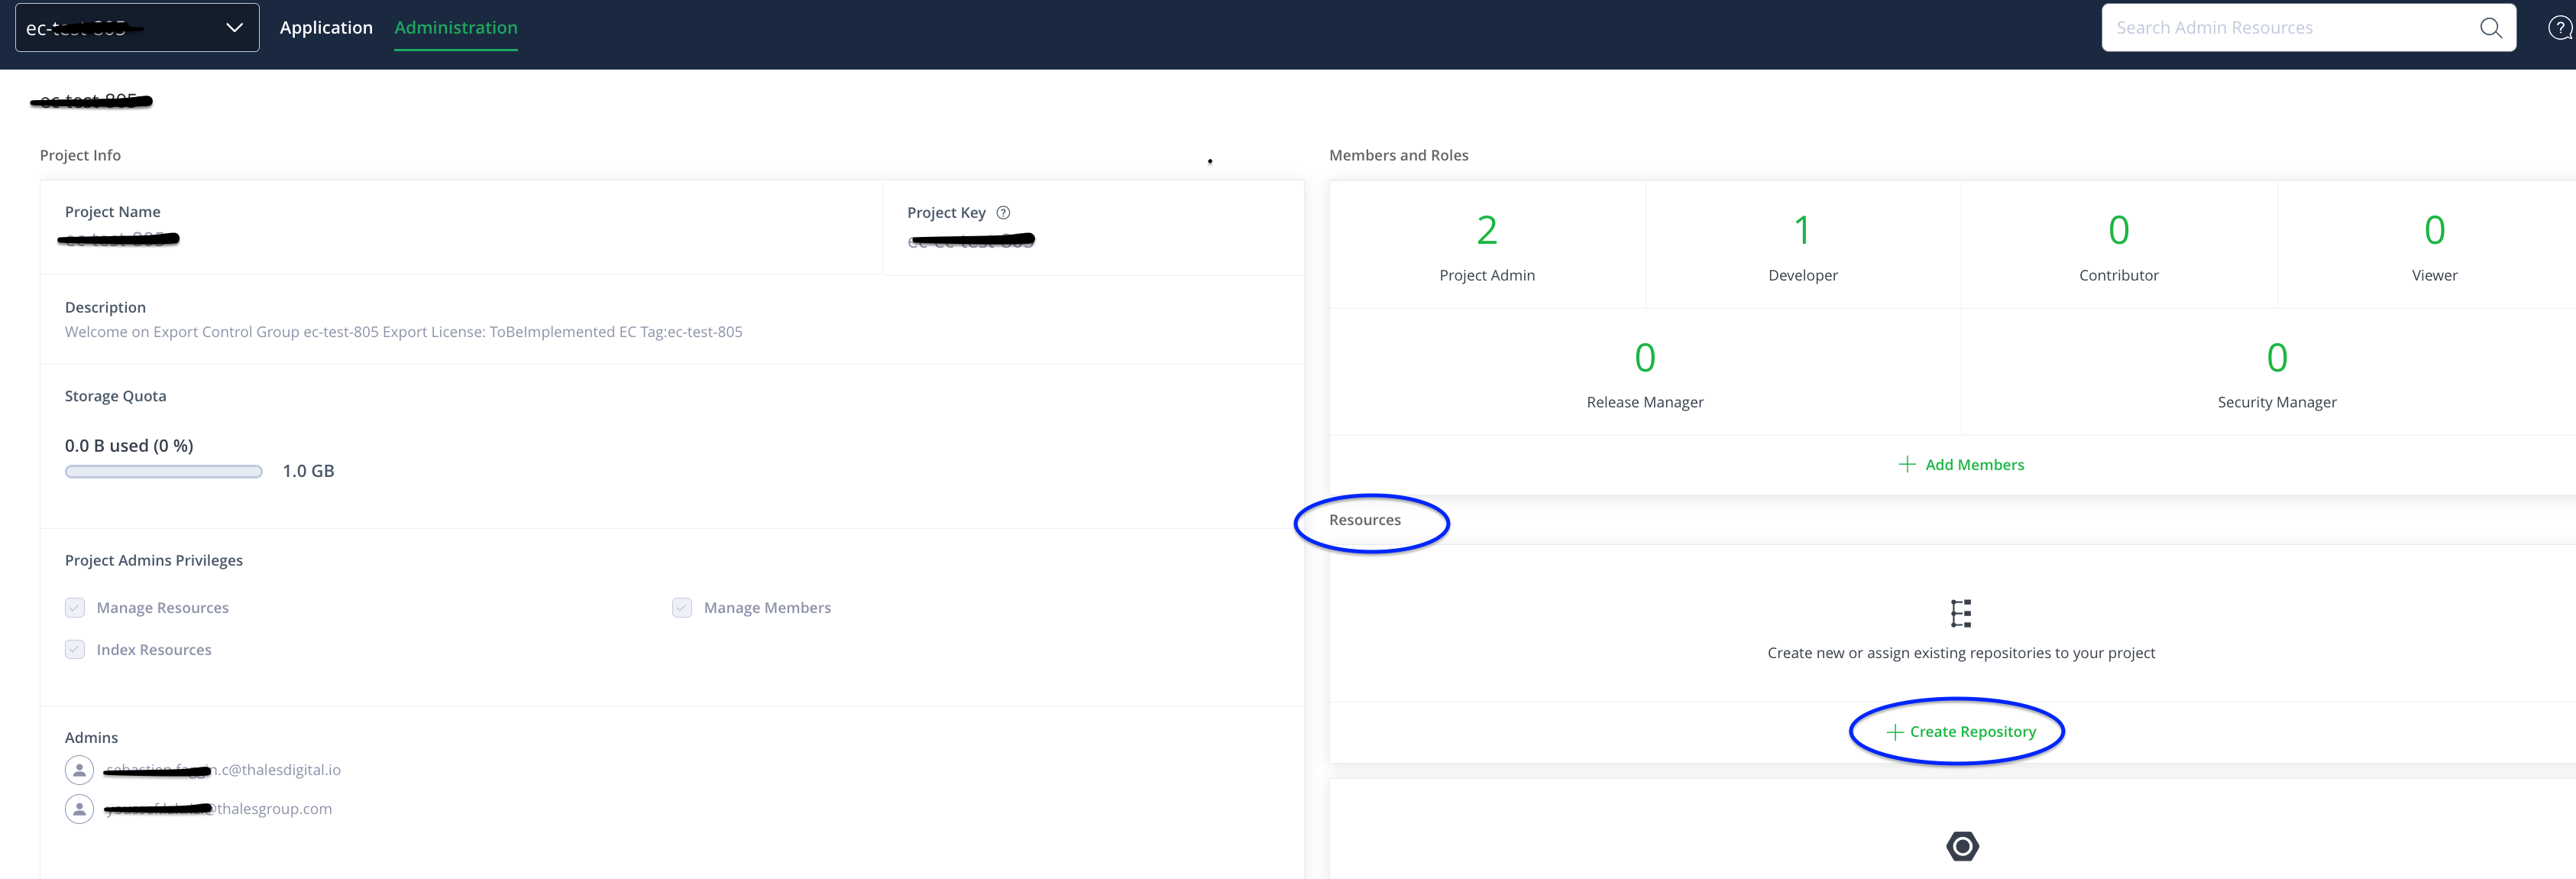
- Select your project in the Projects drop-down menu.
- Select the Administration tab on the top menu.
- In the
Resourcessection, selectCreate Repository. - Select the type of repository you need (Local, Remote, or Virtual).
- Configure the repository settings, such as name and package type.
Please refer to the naming conventions and guidelines provided in the Artifactory Guide .
Assign Repositories to Projects
📩 This action can be done by the platform administrator at the request of the project administrator.
The request should include some details and justifications:
- Necessity to move the repository to the project.
- Proof that the requested repository is used (only) by the same team as the project.
- Confirmation that the repository is not already assigned to another project.
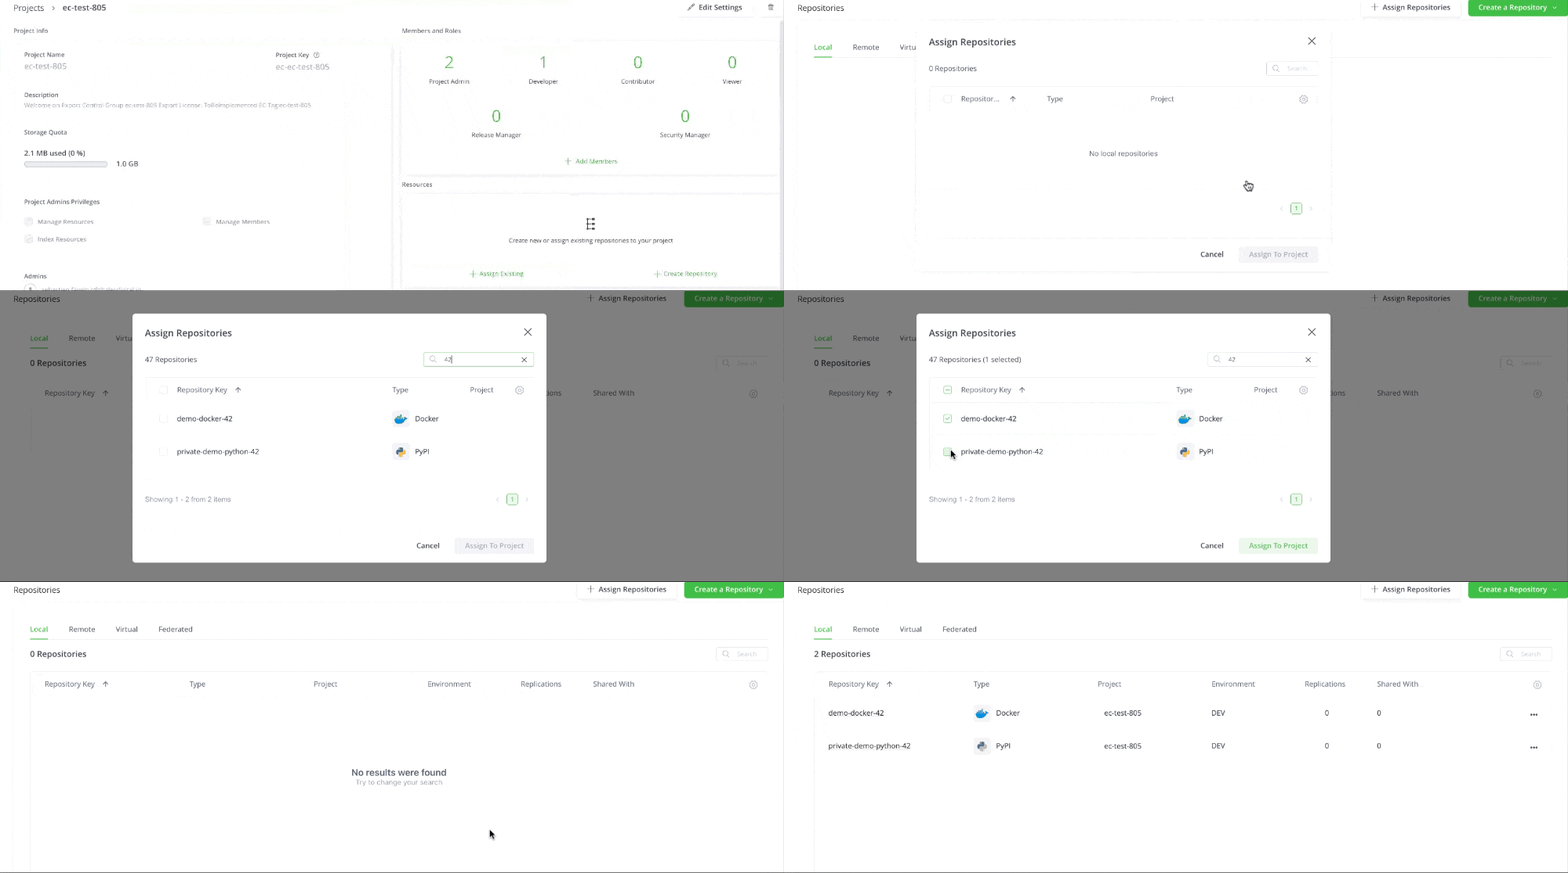
Once the checks are done, the platform administrator can proceed with the repository assignment:
Adminitrator Instructions
- Select your project in the Projects drop-down menu.
- Select the Administration tab on the top menu.
- In the
Resourcessection, selectAssign Repository(this is not visible to end-users). - Select the type of repository requested (Local, Remote, or Virtual).
- Select the repository from the list.
- Select
Assign To Projectto finalize the repository assignment.
Configure Project Members
This action can be performed by the project administrator without requiring a platform administrator. To configure project members, follow these steps:
- Within your newly created project, go to the User Management > Members tab.
- Select
Add Members. - Search for and select the users you want to add to the project.
- Assign appropriate roles.
Add Partners as Project Members
This action can be performed by the project administrator without requiring a platform administrator.
- Request a nominative account or a service account from your Artifactory platform administrator.
- Specify that the account is for a partner and should be flagged as external.
- Once created, ensure that the partner’s account is in the external user group (External_User), which can only see public repositories.
- Grant access to the account on the project by adding it to the project members list.
Share Repository
📩 This action can be performed by your platform administrator, specifying the following elements:
- The project (source) you want to share
- The repository(ies) from the source project you want to share
- The project (target) to which it will be shared
Adminitrator Instructions
- Select the project in the Projects drop-down menu.
- Select the Administration tab on the top menu.
- Navigate to
Repositorieson the left side menu. - Find the repository you want to share, select the
..., and thenShare. - Select the project to share the repository with.
- Select
Saveto finalize the sharing process.
If you wish to set your project to be Internal/Inner Source, you can ask your platform administrator to provide you the name of the internal user group and then add it to the project members list.
Migrate to Project
Migrate Existing Repositories
To migrate existing repositories to a new project, follow these steps:
Create a New Project:
- 📩 Request the creation of a new project .
Create a Virtual Repository:
- Create a new Local Repository within the project to store your artifacts.
- Create a new Virtual Repository within the project that aggregates your newly created repository with the old one.
- Reference this virtual repository in your CI/CD pipeline.
Push New Artifacts:
- Push your new artifacts to the new repository of your project.
- Gradually migrate your data from the old repository to the new repository.
This process will be transparent for your CI/CD pipeline since the virtual repository will serve as the facade.
Project Deletion
📩 Project deletion can be performed by the platform administrator upon request from the project administrator.
The request should include the following details:
- Reason for deletion
- Confirmation that all repositories associated with the project has been reassigned to another project or are no longer needed.
Reassignment of Repositories
Administrator Instructions
- Navigate to the project in the Projects drop-down menu.
- Go to the Administration tab and select the
Repositoriessection. - Select the repository you want to reassign from Local, Remote, or Virtual.
- Change the project from the current one to the target project.
Deletion of Repositories
Administration Instructions
- Navigate to the project in the Projects drop-down menu.
- Go to the Administration tab and select the
Repositoriessection. - Select the repository you want to delete from Local, Remote, or Virtual tabs.
- You can order the repositories by name or by project, so you can focus only on the repositories associated.
- On the right side of the repository, select
..., then chooseDeleteand confirm the deletion.
Delete Project
Administrator Instructions
- Navigate to the Administration tab.
- Select
Projectsfrom the drop-down menu, leavingAll Projectsselected. - Find and select the project you need to delete.
- On the top right of the project screen, select the trashcan icon
- Confirm the deletion.
