version v7.2.
For up-to-date documentation, see the
latest version.
Teapot Tuto
8 minute read
Overview
In this tutorial, you’ll learn how to create and deploy a first app from Software Factory C2 to a TDP C2 K8SaaS (the managed Azure Kubernetes Service offered by the TDP C2).

Prerequisites
- Enroll your user account in a TDF account (billing account).
- Request a DevSecOps offer (needed for GitLab and Artifactory) or Request a DevSecOps InnerSource access if you are only working on InnerSource projects. DevSecOps InnerSource is sponsored by TGS/TCE (Thales Corporate Engineering)
- Subscribe to IaaS Discover offer (K8SaaS)
TIPS: If you’re stuck with Multi-Factor Authentication (MFA), you can check this documentation or request a reset .
- Get a development endpoint with Docker (ie. TNAP , LEAP )
- Ensure that you have configured Git to work with your GitLab repository. In this tutorial, we use SSH for authentication, but you can also configure Git to use HTTP by setting up your GitLab credentials accordingly.
NOTE: This tutorial is working on TNAP and LEAP running WSL with Ubuntu 24.04
Tutorial
To get started, we will:
- Create a GitLab project and push our first source code
- Connect to Artifactory and generate an identity token to permit the pipeline to pull the Docker image
- Create a Docker file to generate our webapp image
- Add a GitLab pipeline to build and deliver our webapp
GitLab project & Source Code
NOTE: For our tutorial, we will use Rust-pipeline example located inside the InnerSource project nextgen-cicd . In the next command, replace this project by yours.
- Create a new GitLab project
on GitLab interface
- Choose Create a blank project
- Fill-in the project’s name
- Select Create project
- Clone locally the new repository :
git clone git@gitlab.thalesdigital.io:<repository>.git
- Create a dev branch
cd <repository>
git checkout -b teapot-tuto
Our webapp will be a simple HTTP server that listens on a configurable port and returns 418 status - I’m a teapot 🫖 error code to any GET request.
Below, we will create this webapp in Rust 🦀.
- If you have not Rust installed on your endpoint, you can open a
bashin nextgen-cicd rust image to executecargocommands.
 docker run -it -p 1234:1234 -v $PWD:/usr/src/ -w /usr/src --user $(id -u)  \
  registry.thalesdigital.io/nextgen-cicd/catalog/step/rust:1.1.1 bash
On Leap endpoint, add
-v > /etc/ssl/certs/ca-certificates.crt:/etc/ssl/certs/ca-certificates.crt
- Init the Rust project in your Git repository:
cargo init --name teapot
- Solution 1 Use ThalesGPT
to generate a such application and copy generated source code in
src/main.rs
Generate a rust application which will listen HTTP GET request on port 1234 and will always return HTTP 418 “I’m a teapot. Add a unitary test. Use actix_web and not tokyo, nor actix_rt.”
- Solution 2 Retrieve the webapp source code from the NextGen CICD Rust example
and copy it into
src/main.rs. - Add
actix_webcrate:
cargo add actix_web
- Build the application:
cargo build
- Test the application
cargo test
- Run the webapp :
cargo run
- In another terminal, try to call the webapp :
no_proxy=127.0.0.1 wget http://127.0.0.1:1234
You should see:
2024-12-18 16:09:43 ERROR 418: I'm a teapot.
- Commit & push your work
git commit -a -m "feat(teapot): Add the webapp source code"
git push -u origin teapot-tuto
Create build pipeline
Prerequisite: Enable instance runner :
Setting >> CICD >> Runners >> Enable instance runners for this project
We are going to create a first GitLab pipeline, based on nextgen-cicd Rust step , which will build our application.
- Create a
.gitlab-ci.ymlwith following content at the root of your project:
include:
  - project: nextgen-cicd/config
    file: config.yml
  - project: 'nextgen-cicd/release'
    ref: 'master'
    file:
      - 'step/rust.yml'

stages:
  - 🧪 Build & TU
  - 🎨 Code Quality
  - 🛡️ Code Security

variables:
  CARGO_HOME: $CI_PROJECT_DIR/.cargo

cargo:
  stage: 🧪 Build & TU
  extends: .rust_build_n_ut

clippy-fmt:
  stage: 🎨 Code Quality
  extends: .rust_code_quality

coverage:
  stage: 🎨 Code Quality
  extends: .rust_coverage

cargo-audit:
  stage: 🛡️ Code Security
  extends: .rust_audit
- Create a
.config/nextest.tomlwith following content:
[profile.ci]
failure-output = "immediate-final"
fail-fast = false

[profile.ci.junit]
path = "junit.xml"
NOTE: This file is used by cargo nextest command to export test results in JUnit format, needed by GitLab
- Commit and push
git add .gitlab-ci.yml .config/nextest.toml
git commit -m "feat(ci): Add first pipeline"
git push
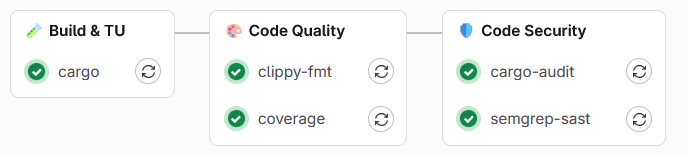
- Check pipeline execution in GitLab or directly in VSCode if you’re using GitLab workflow extension .
Add Docker image
Let’s create a Dockerfile to package our webapp into a Docker image. We will use a Ubuntu image from Thales Container Base Images (TCBI ).
- Create a
Dockerfilewith following content:
FROM artifactory.thalesdigital.io/docker-internal/base-images/amd64/ubuntu:24.04.1

USER root
WORKDIR /opt/app/bin
COPY target/debug/teapot .
RUN chmod +x teapot

USER bob
EXPOSE 1234

CMD ["./teapot"]
NOTE: The application is built on Ubuntu 24.04, so we use a matching Docker image to ensure libc compatibility.
- Build the Docker image:
docker build -t teapot .
NOTE: To be able to pull the TCBI image from your local endpoint, you need to configure your credentials.
docker login artifactory.thalesdigital.io
username: your e-mail addresspassword: your personal Artifactory Identity Token
- Launch the container:
docker run --rm -p 1234:1234 teapot
- Test the application
wget http://127.0.0.1:1234
- Commit and push
git add Dockerfile
git commit -m "Add Dockerfile"
git push
Create Docker pipeline
Let’s build our Docker image with GitLab CI/CD using nextgen-cicd Docker step and deliver it into GitLab Container Registry.
- Include the nextgen-cicd Docker step in your
.gitlab-ci.yml:
  - project: 'nextgen-cicd/release'
    ref: 'master'
    file:
      - 'step/rust.yml'
      - 'step/docker.yml'
- Add a
Deploymentstage :
stages:
  - 🧪 Build & TU
  - 🎨 Code Quality
  - 🛡️ Code Security
  - 🚀 Deployment
- Add a
deliverjob which extends the Docker step:
deliver:
  variables:
    CICD_DOCKER_TAG_NAME: $CI_REGISTRY_IMAGE/$CI_PROJECT_NAME:rust
    CICD_REGISTRY_AUTHENT: "{\"auths\":{
      \"artifactory.thalesdigital.io\":
      {\"username\":\"$SRV_ACCOUNT_USER\",\"password\":\"$SRV_ACCOUNT_PASSWD\"},
      \"$CI_REGISTRY\":
      {\"username\":\"$CI_REGISTRY_USER\",\"password\":\"$CI_REGISTRY_PASSWORD\"}}}"
  stage:  🚀 Deployment
  extends: .docker
- Define
SRV_ACCOUNT_USERandSRV_ACCOUNT_PASSWDin Settings » CI/CD » VariablesSRV_ACCOUNT_USER= your Artifactory e-mail addressSRV_ACCOUNT_PASSWD= Create a dedicated Artifactory Identity Token and check “masked and hidden”
WARNING Quick solution for the tutorial only. Production project must use a Service Account . NOTE
CICD_REGISTRY_AUTHENTis used by nextgen-cicd Docker step to pull the image defined by theFROMdirective in the Dockerfile.
- Commit and push
git add .gitlab-ci.yml
git commit -m "ci: Build docker image"
git push
- Check pipeline execution
- Check that your image is now available in the GitLab registry:
Deploy >> Container Registry
NOTE: To see a more complete pipeline for building Docker image, check this Build & Deploy Docker Image example.
Create and access to your K8aaS
We want to create a K8aaS to deploy our new teapot webapp.
- Install Azure CLI (
az)
curl -sL https://aka.ms/InstallAzureCLIDeb | sudo bash
- Install
kubectl(see kubectl official documentation )
curl -LO "https://dl.k8s.io/release/$(curl -L \
  -s https://dl.k8s.io/release/stable.txt)/bin/linux/amd64/kubectl"
sudo install -o root -g root -m 0755 kubectl /usr/local/bin/kubectl
- Install
kubelogin
sudo snap install kubelogin
- Configure the access to the cluster with your credentials (provided on subscription)
- Check the state of your cluster:
az aks show --name "$K8SAAS_RESOURCE_NAME" \
  --resource-group "$K8SAAS_RESOURCE_NAME" \
  --query powerState.code
WARNING: Don’t forget to switch off your cluster when not used
az aks stop --name "$K8SAAS_RESOURCE_NAME" --resource-group "$K8SAAS_RESOURCE_NAME"
Create & deploy Helm chart
A Helm chart is a package format for Kubernetes that bundles together all the necessary YAML manifests, templates, and configuration values needed to deploy and manage an application, making it easier to version, share, and consistently deploy applications across different Kubernetes clusters.
We will now create a first Helm chart defining the deployment and the service associated with our application. Our deployment consists solely of our Docker image, and the service exposes port 1234.
- Create a
teapot.ymlwith the following content:
apiVersion: apps/v1
kind: Deployment
metadata:
  name: teapot
spec:
  replicas: 1
  selector:
    matchLabels:
      app: teapot
  template:
    metadata:
      labels:
        app: teapot
    spec:
      imagePullSecrets:
      - name: gitlab-tdp
      containers:
      - name: teapot
        image:  <your_teapot_image>
        imagePullPolicy: Always
---
apiVersion: v1
kind: Service
metadata:
  name: teapot
spec:
  type: ClusterIP
  ports:
    - port: 1234
  selector:
    app: teapot
Replace
image:with your Docker image located in GitLab Registry (Deploy » Container » Registry).Create a Docker Registry Secret for Kubernetes to be able to pull our Docker image from
registry.thalesdigital.io:
kubectl create secret docker-registry gitlab-tdp \
    --docker-server=registry.thalesdigital.io \
    --docker-username=<login> \
    --docker-password=<passwd> -n customer-namespaces
--docker-username: gitlab e-mail adress--docker-password: gitlab Personnal Access Token
NOTE: GitLab Access Token needs only
read_registrypermission
- Apply your deployment and service:
kubectl apply -f teapot.yml --namespace customer-namespaces
TIP: To see your Pods/Deployments/Services:
kubectl get services,deployments,pods -n customer-namespacesYou can also take a look on k9s tool.
Redirect the service port to a local port on your endpoint:
kubectl port-forward service/teapot 1234:1234 -n customer-namespaces
Test your service from your endpoint:
wget http://127.0.0.1:1234
2024-12-20 10:46:39 ERROR 418: I m a teapot
Configure Ingress
An Ingress resource provides HTTP/HTTPS routing rules to expose your Kubernetes services to external traffic by configuring a layer 7 load balancer, allowing you to map incoming requests to specific services based on hostnames, paths, and other HTTP properties.
Create the file teapot-ingress.yaml with the following content:
apiVersion: networking.k8s.io/v1
kind: Ingress
metadata:
  name: hello-world-ingress
  annotations:
    cert-manager.io/cluster-issuer: letsencrypt-prod
    nginx.ingress.kubernetes.io/enable-modsecurity: "true"
    nginx.ingress.kubernetes.io/modsecurity-snippet: |
      SecRuleEngine On
      SecAuditLog /dev/stdout
      SecAction "id:900200,phase:1,nolog,pass,t:none, setvar:tx.allowed_methods=GET HEAD POST OPTIONS PUT PATCH DELETE"
      Include /etc/nginx/owasp-modsecurity-crs/nginx-modsecurity.conf
spec:
  ingressClassName: nginx
  tls:
  - hosts:
    - hw-ingress-teapot.demo.eu2.k8saas.thalesdigital.io
    secretName: tls-secret
  rules:
  - host: hw-ingress-teapot.demo.eu2.k8saas.thalesdigital.io
    http:
      paths:
      - path: /
        pathType: Prefix
        backend:
          service:
            name: teapot
            port:
              number: 1234
Replace
eu2.k8saas.thalesdigital.iowith your DNS zone.Apply ingress:
kubectl apply -f teapot-ingress.yaml --namespace customer-namespaces
- Check ingress configuration
kubectl get ingress -n customer-namespaces
Test your teapot 🫖 (can take up to 5 min to be ok):
curl -Lv hw-ingress-teapot.demo.eu2.k8saas.thalesdigital.io
                      (
                        )     (
                 ___...(-------)-....___
             .-""       )    (          ""-.
       .-'``'|-._             )         _.-|
      /  .--.|   `""---...........---""`   |
     /  /    |                             |
     |  |    |                             |
      \  \   |                             |
       `\ `\ |                             |
         `\ `|                             |
         _/ /\                             /
        (__/  \                           /
     _..---""` \                         /`""---.._
  .-'           \                       /          '-.
 :               `-.__             __.-'              :
 :                  ) ""---...---"" (                 :
  '._               `"--...___...--"`              _.'
    \""--..__                              __..--""/
     '._     """----.....______.....----"""     _.'
        `""--..,,_____            _____,,..--""`
                      `"""----"""`
Resources
- Rust-Pipeline NextGen example
- MCS Documentation