version v7.2.
For up-to-date documentation, see the
latest version.
Python pipeline Tuto
7 minute read
Getting started
This Tutorial serves as an introduction to using GitLab CI/CD by creating a CI/CD pipeline for a basic Python application.
First, we’ll present an example of a standard GitLab CI/CD pipeline. Following that, we’ll explore integration with NextGen CI/CD .
To get started, we will :
- Checkout the repository for a basic Python application.
- Define Pipeline Stages
in the
.gitlab-ci.ymlfile. - Define jobs to be executed within each pipeline stage
- Define Variables for job configurations.
- Execute and monitor the pipeline.
- Explore triggers to automate pipeline execution based on events.
Checkout the Python Repository
The example application consists of a basic Python code that converts km/h into MPH (US).
The aim here is not to present Python, but rather the GitLab CI/CD pipeline.
You can clone the repository using the git clone command and work locally.
Define stages
To create a GitLab CI/CD pipeline, start by creating a .gitlab-ci.yml file in repository.
This YAML file contains the definition of our pipeline. Let’s begin with the following example:
stages:
- Unit Testing
- Code Analysis
- Security
- Build
- Deployment
This section of the pipeline defines the stages
that will be executed during the pipeline.
The order of the stages is important because they will be executed sequentially as defined
However, it is possible to alter this sequential order using keywords like needs .
Define jobs
A stage is a set of jobs, now let’s define the job related to those stages, let start with test stage.
Test Stage
It will contain one job unittest-job that will run a SAST analysis on code:
unittest-job:
  stage: Unit Testing
  before_script:
    - python3 -m pip install unittest-xml-reporting
  script:
    - python3 -m xmlrunner discover -v -s ./test -p
  after_script:
    - cat TEST*.xml
  artifacts:
    when: always
    paths:
      - "$CICD_PYTHON_DIR/*.xml"
    reports:
      junit: TEST-*.xml
Let’s take a closer look at the content of this part of the code.
When implementing a job, you should always link it to the stage where it will be running
with the stage keyword.
Inside the script
part, you write the code related to the job.
Here we have installed unittest libraries to execute tests.
The keyword before_script means that this will be run before the script starts,
while the keyword after_script
means that this will be run after the script ends.
artifacts
is another important keyword to know. It allows you to save files for later use.
In our exemple, it can save the unit test reports for sonar per instance.
- Please note that if a job in a stage fails the next stage doesn’t execute and the pipeline ends early.
- Also note that all jobs in a stage run in parallel while the stages run sequentially.
Code Analysis part
Here we find the definition of two jobs, both related to Code Analysis stage.
One is security-linter-job scanning code with the BANDIT tool. And the second sonar_job.
Note that for this particular job, we’ve indicated that we want to use a specific image which contains all the requirements for SonarQube.
Inside the repository, there is a script for manual installation of sonar-scanner.
We have to add the variable SONAR_TOKEN in
Settings > CICD > Variables
.
More on this at the end of the document.
security-linter-job:
  stage: Code Analysis
  script:
  - python3 -m pip install  bandit
  - python3 -m bandit -r app_sample test

sonar-job:
  stage: Code Analysis
  image: artifactory.thalesdigital.io/docker/sonarsource/sonar-scanner-cli:4.8.1
  script:
  - sonar-scanner -Dsonar.login=$CICD_SONAR_AUTH_TOKEN -Dsonar.python.coverage.reportPaths=TEST-*.xml
  dependencies:
  - unittest-job
  allow_failure: true
dependencies
is a keyword that define a list of specific jobs to fetch from.
In this example, the sonar-job job declare that it requires the artifacts produced by
the previous unittest-job job to function properly.
Build & Deployment
Let’s move on to define the two last jobs:
build-job:
  stage: Build
  script:
    - python3 -m pip install --upgrade build
    - python3 -m build
  artifacts:
    paths:
      - dist/*

deploy-artifactory-job:
  stage: Deployment
  script:
    - python3 -m pip install --upgrade twine
    - python3 -m twine upload dist/* --repository-url ${PYPI_REPO_URL} --username ${CICD_ARTIFACTORY_USERNAME}
      --password ${CICD_ARTIFACTORY_APIKEY}
  allow_failure: true
  #if those variables are not correctly set this command will fail
The first job run commands to build the project. note that you need pyproject.toml to execute the build command.
The second one will use twine as tool for uploading Python packages to Artifactory.
Define Conditional Jobs
You can define rules on jobs to control their execution. In the example below, the SAST job will
only run if the pipeline is launched in the context of a merge request targetting the main branch.
We are going use the keyword is rules and some CICD predefined variables
.
sast:
  variables:
    SEARCH_MAX_DEPTH: '2'
  stage: Security
include:
  - template: Security/SAST.gitlab-ci.yml
rules:
  - if: $CI_MERGE_REQUEST_TARGET_BRANCH_NAME == "main"
    when: on_success
rules: This keyword defines constraints and conditions for when jobs should be executed in the CI/CD pipeline.if: This statement is used to specify a conditional expression that determines whether the job should run.when: This keyword is used in a job definition to specify under what circumstances a job should be executed.
In our case, the job will only run if the merge request’s target branch is “main” and all preceding jobs in the pipeline have been successful.
Define variables
As you have seen in the previous part of the code, we have used some variables like
{PYPI_REPO_URL}, {CICD_BANDIT_ARGS} or CICD_UNITTEST_PATH.
Those can be defined inside the pipeline like that :
variables:
  CICD_BANDIT_ARGS: '-r app_sample test'
  CICD_UNITTEST_PATH: './test -p "convertion_unittest.py"'
As you can expect, it’s not a good idea to put sensitive data such as CICD_ARTIFACTORY_APIKEY or
$CICD_SONAR_AUTH_TOKEN directly in the file; it’s better to define them in the project (or group)
settings.
To do so:
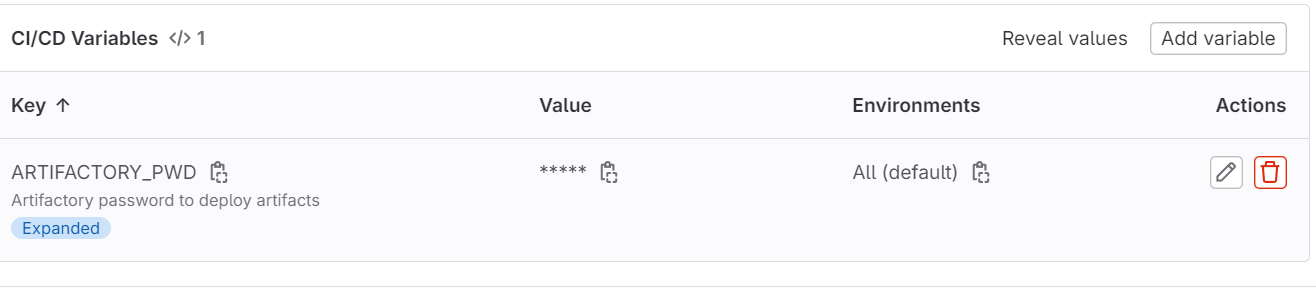
- Navigate to Settings > CI/CD
- Expand the Variables section
- Select Add variable to add a new variable
- Fill the form that will open on the right side of the screen with at least Key and Value.
- Select Visibility to Masked or Masked and hidden.
Execute the Pipeline
we’re getting close to our goal; now we need a few minor adjustments for a successful pipeline launch.
Activate Runners
By default, the pipeline would have started but it will quickly get stuck.
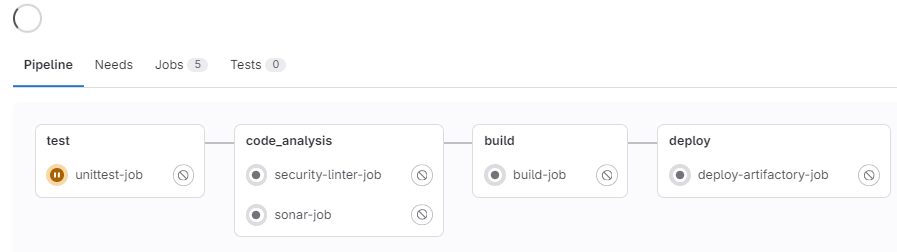
This could happen because there isn’t any runner enabled on the project (or group).
To enable a runner, navigate to Settings > CI/CD > Runners and Enable instance runners for this project.

Include Image
The image keyword is the name of the Docker image.
You can define an image that’s used for all jobs, and a list of services that you want to use during
runtime.
We will need a container based on an image that meets the requirements for most of the jobs.
image: artifactory.thalesdigital.io/docker/python:3.10-alpine
Please refer to this page to setup configuration to pull image.
On the left menu sidebar, navigate to Build > Pipelines , you will see a consolidated view of pipelines summaries. Select the pipeline number you want to check:

If your pipeline is green, that means that all steps and stages run correctly and you can view a newly created SonarQube project:
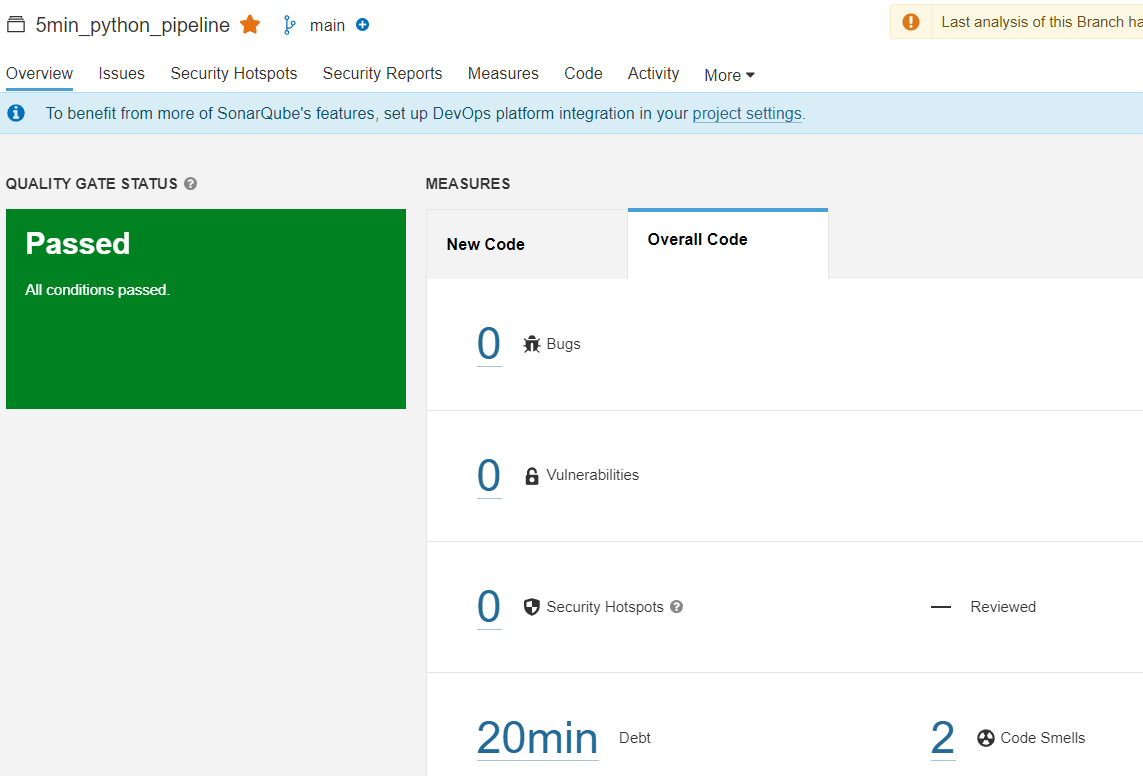
You can get more details on your pipeline executions by checking pipeline graph, selecting job to get job logs…
Pipeline triggers
There are many ways to trigger a CI/CD pipeline, from commits to merge requests, schedules, API call to manual triggers.
Push Events
stages:
  - build
  - test

build-job:
  stage: build
  script:
    - echo "Building..."
  only:
    - branches

test-job:
  stage: test
  script:
    - echo "Testing..."
  only:
    - tags
Merge Request Events
stages:
  - build
  - test

build-job:
  stage: build
  script:
    - echo "Build for MR..."
  rules:
    - if: '$CI_PIPELINE_SOURCE == "merge_request_event"'

test-job:
  stage: test
  script:
    - echo "Test for merged code..."
  rules:
    - if: '$CI_PIPELINE_SOURCE == "push"'
    - when: manual
Scheduled Pipelines
schedule:
  cron: '0 2 * * *'
  script:
    - echo "Scheduled pipeline running..."
Read the offical documentation if you need more informations of the types of pipelines .
Troubleshooting
- Learn how to validate your pipeline YAML syntax.
- Learn how to manage your CI/CD variables .
- Check your external tools (SonarQube, Artifactory) if there are up and you have right credentials
- Ensure consistent and reliable application builds.
- Quickly identify and resolve issues via automated testing.
- Maintain code quality through integration with tools like SonarQube.
- Secure your application by running security scans.
- Simplify complex workflows with reusable steps and predefined rules.
Run a pipeline using NextGen steps
Now that GitLab CI/CD is clearer, we can move forward to use the NextGen CI/CD .
It’s a catalogue of steps to help you build a pipeline in 5 minutes with fast, secure, ready-to-use job steps.
Please go to How to build your Python pipeline using nextGen