version v7.2.
For up-to-date documentation, see the
latest version.
GitLab secure repo
4 minute read
Proctecting branches
Navigate to Your Repository Settings:
- Go to your GitLab project.
- Navigate to Settings > Repository.
- Scroll down to the Protected branches and expand section.
- Select Add protected branch
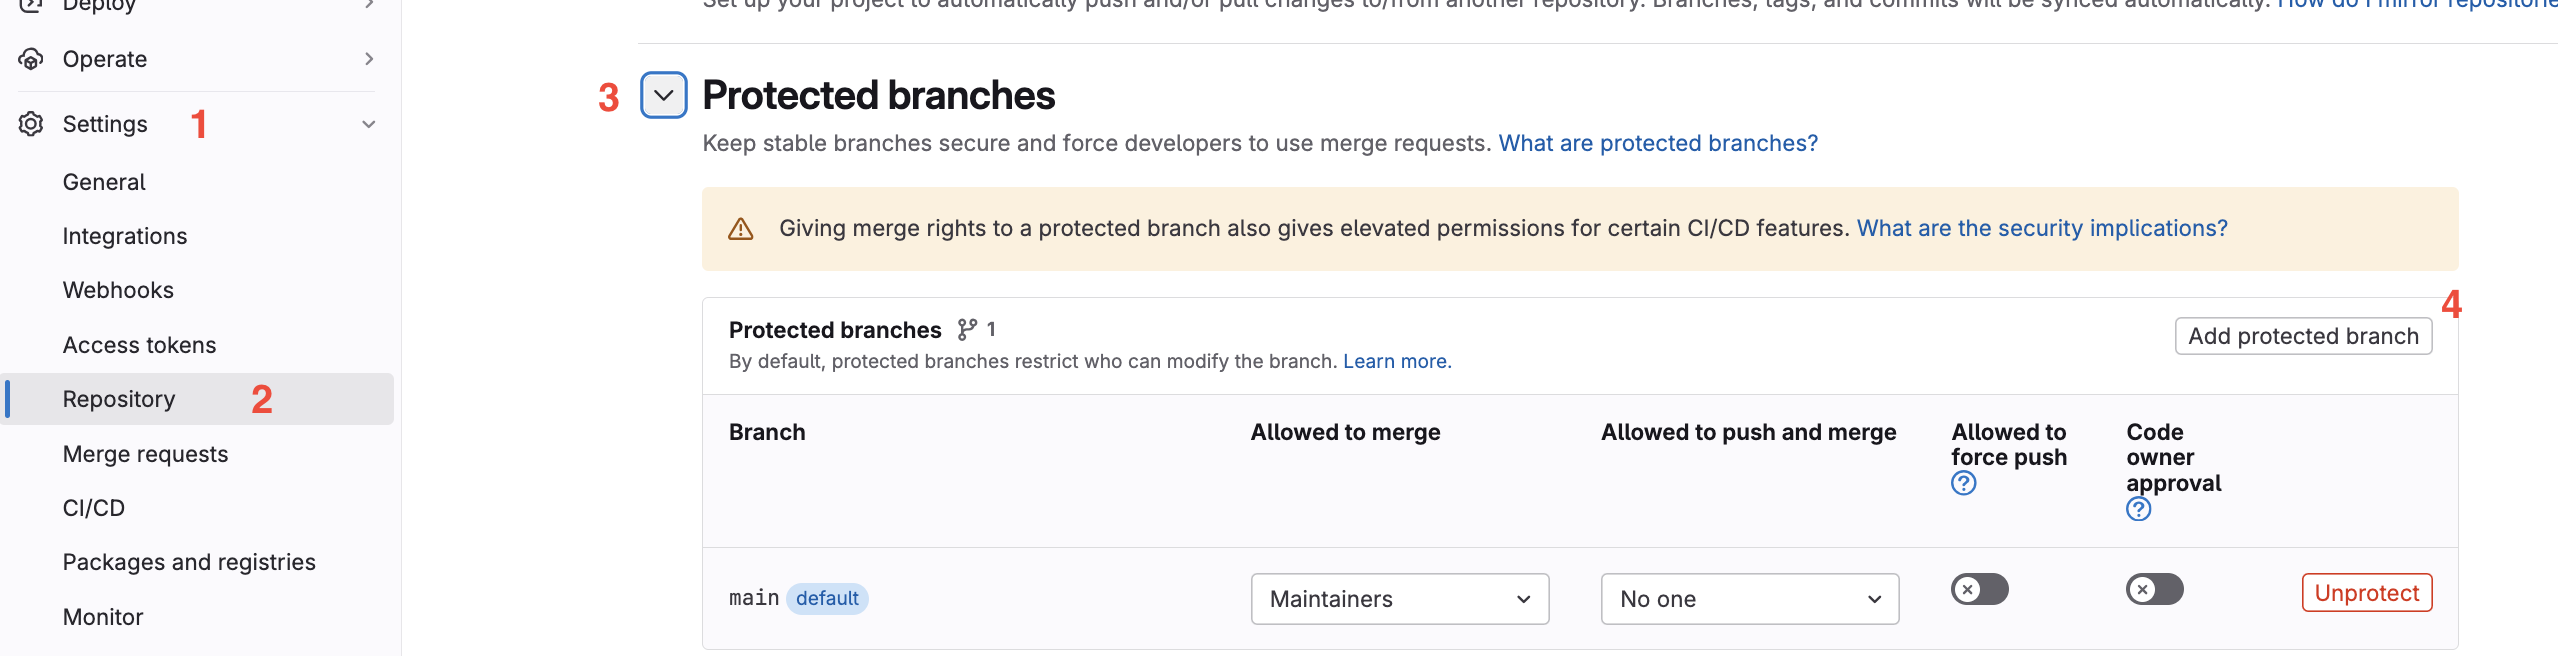
Configure a Protected Branch:
- In the Protect a branch form, select or type the name of the branch you want to
protect (e.g.,
main,develop, orprod*). - Select values to Allowed to Merge (ex: Select
Maintainers). - Select values to Allowed to Push: (ex:
Maintainersor specific trusted users).
- In the Protect a branch form, select or type the name of the branch you want to
protect (e.g.,
Define more settings:
- Allowed to Force Push: Force pushing is not recommended on shared branches, so it is recommended to leave this option unchecked.
- Require Approval from code Owners: If applicable, check the box to require code owners’ approval.
Finalize the configuration:
- Select Protect
Set Up CI/CD Secret Variables in GitLab
CI/CD secret variables are used to securely store sensitive information (like passwords, API keys, and tokens) that your CI/CD pipelines require. Here’s a detailed guide on how to set up and manage those secret variables in GitLab:
Steps to Set Up CI/CD Secret Variables
Navigate to CI/CD Settings:
- Go to your GitLab project.
- Navigate to Settings> CI/CD
Expand Variables Section:
- Scroll down to the Variables and expand the section.
Add a New Secret Variable:
- Select the Add variable button to create a new variable.
- Fill in the following fields:
- Type: select your variable type (variable or file).
- Environment Scope: Specify the environment scope if the variable should apply only
to specific environments (e.g.,
production,staging). - Protect Variable: Check this box if the variable should only be available for protected branches. This ensures the variable is not exposed in lower environments or unprotected branches.
- Mask Variable: Check this box if the variable should be masked in job logs. Masking hides the value in the CI/CD log output.
- Description (optional)
- Key: Enter a name for your variable (e.g.,
AZURE_SECRET_KEY,DATABASE_PASSWORD). - Value: Enter the secret value for the variable (e.g., the actual password or key).
Save the Variable:
- After filling in the details, select the Add variable button to save the secret variable.
Example of Using CI/CD Secret Variables in .gitlab-ci.yml
Once you have set up your secret variables, you can reference them in your .gitlab-ci.yml file as follows:
stages:
  - build
  - deploy

build:
  stage: build
  script:
    - echo "Building application"

deploy:
  stage: deploy
  script:
    - echo "Deploying application"
    - echo "Using database password: $DATABASE_PASSWORD"
  only:
    - main
In the example above, the $DATABASE_PASSWORD is a CI/CD secret variable that will be securely
injected into the job when the pipeline runs.
Commit Signing with GPG in GitLab
Generate a GPG Key:
Generate a GPG key pair on your local machine. Follow the steps to generate a key according to the GitLab guide:
gpg --full-generate-keyChoose the desired key type (e.g., RSA and RSA) and key size (a minimum of 2048 bits is recommended).
Set the key’s expiration date and provide your user ID information, such as your name and email address.
Protect your private key with a strong passphrase.
Find Your GPG Key ID:
List your GPG keys to find the key ID of your new key:
gpg --list-secret-keys --keyid-format LONGLook for the section containing
sec, which lists your secret keys. The key ID follows4096R/. It looks like this:sec 4096R/ABCDEF12 2025-01-01 [expires: 2026-01-01]
Configure Git with Your GPG Key:
Configure Git to use your GPG key for signing commits:
git config --global user.signingkey YOUR_GPG_KEY_ID
Add Your GPG Key to GitLab:
Export your GPG public key:
gpg --armor --export YOUR_GPG_KEY_IDCopy the output of the command, which looks like this:
-----BEGIN PGP PUBLIC KEY BLOCK-----
...
-----END PGP PUBLIC KEY BLOCK-----
Go to your GitLab profile settings: User Settings > SSH Keys.
Select GPG Keys.
Paste the copied public key into the Add GPG Key field and select Add Key.
Sign Your Commits:
When making a commit, add the
-Sflag to sign the commit:git commit -S -m "Your commit message"Enter your GPG key passphrase when prompted to sign the commit.
Verify Signed Commits in GitLab:
- Navigate to your project in GitLab.
- Go to the Commits tab to view the commit history.
- Signed commits will display a “Verified” badge next to them, indicating they have been successfully signed and verified.
Benefits of Commit Signing
- Authentication: Ensures that the commit actually came from the person who claims to have made it.
- Integrity: Guarantees that the commit has not been altered since it was signed by the original author.
- Accountability: Helps in tracking down the origin of changes, which is useful for auditing and forensic purposes.
Best Practices
- Use Strong Passphrases: Protect your private key with a strong, unique passphrase.
- Manage Key Revocation: If your private key is compromised, revoke it promptly and generate a new one.
- Regularly Update Keys: Periodically update your GPG key pair to maintain security.
For further details, refer to the official GitLab documentation on signed commits with GPG .