version v7.2.
For up-to-date documentation, see the
latest version.
JFrog Generate SBOMs
8 minute read
A Software Bill of Materials is a machine-readable inventory of all components, libraries and dependencies shipped inside software.
This page shows how to generate SBOMs during the development lifecycle.
This page focuses on SBOM generation and visibility. For policy enforcement, violation management, and license compliance, see Xray License Scanning .
SBOMs generation with JFrog CLI
You can locally use the JFrog CLI and Xray, either from source manifests or from compiled artifacts, before (or even without) pushing artifacts to Artifactory.
Requirements
You will need a JFrog CLI-enabled CI image and an Xray-enabled JFrog Platform instance.
| Requirement | Notes |
|---|---|
| JFrog Xray ≥ 3.x | Required to enrich scan results with CVE data |
| Recent jf CLI > 2.48 | Bundled in the Docker image <jf-cli-docker-image> used by CI jobs |
| CI variables | CICD_ARTIFACTORY_SERVER, CICD_ARTIFACTORY_USERNAME, CICD_ARTIFACTORY_TOKEN |
Configuring the JFrog CLI in CI
The .jfrog-configure hidden job is reused by all jobs.
It registers a named server profile so subsequent jf commands know where to connect.
# gitlab-ci.yml — shared configuration anchor
.jfrog-configure:
  script:
    # Print version to confirm the correct jf CLI image is used
    - jf --version

    # Register the Artifactory instance under a local profile name
    - jf c add <artifactory-server> \
        --insecure-tls=false \
        --url=$CICD_ARTIFACTORY_SERVER \
        --user=$CICD_ARTIFACTORY_USERNAME \
        --access-token=$CICD_ARTIFACTORY_TOKEN

    # Make "<artifactory-server>" the default server for this job
    - jf c use <artifactory-server>
Source analysis with jf audit
jf audit analyses your project’s dependency manifest and resolves the full
dependency tree without requiring a compiled artifact (without building a binary).
Xray then cross-references each component against its vulnerability database.
This page uses Maven and Python as examples, but jf audit supports many
ecosystems via dedicated flags: --gradle, --npm, --yarn, --pip,
--go, --nuget, and others.
Source scan for a Java project
# gitlab-ci.yml — jf-audit-sbom-from-source
jf-audit-sbom-from-source:
  stage: security-sca
  image: $CI_REGISTRY_IMAGE/jf-cli-with-maven:latest
  script:
    - !reference [.jfrog-configure, script]
    # Machine-readable CycloneDX SBOM with vulnerability enrichment
    - jf audit --mvn --sca --sbom --format cyclonedx > <application-name>-source.cdx.json

  artifacts:
    paths:
      - <application-name>-source.cdx.json
    reports:
      cyclonedx:
        - <application-name>-source.cdx.json   # Parsed by GitLab dependency scanning UI
    expire_in: 1 week # Adjust based on your compliance and storage requirements
Source scan for a Python project
jf pip install must run before jf audit --pip so the JFrog CLI can record
the resolved dependency tree. Without it, jf audit --pip cannot fully resolve
transitive dependencies.
# gitlab-ci.yml — jf-audit-sbom-from-source-python
jf-audit-sbom-from-source-python:
  stage: security-sca
  image: $CI_REGISTRY_IMAGE/<jf-cli-docker-image>:latest
  script:
    - !reference [.jfrog-configure, script]
    # Resolve the dependency tree via pip before auditing
    - jf pip install -r requirements.txt
    - jf audit --pip --sca --sbom --format cyclonedx > <python-application>-source.cdx.json
  artifacts:
    paths:
      - <python-application>-source.cdx.json
    expire_in: 1 week # Adjust based on your compliance and storage requirements
Key flags explained
| Flag | Effect |
|---|---|
--mvn | Instructs the CLI to treat this as a Maven project and read pom.xml |
--pip | Instructs the CLI to treat this as a Python project and read requirements.txt |
--sbom | Includes SBOM data in the output |
--sca | Runs Software Composition Analysis (dependency vulnerability scanning) |
--format cyclonedx | Emits a CycloneDX 1.6 JSON document rather than the default tabular output |
--project | (Optional) Associates results with a named JFrog Project to enable Xray policy evaluation — see Xray License Scanning |
Binary analysis with jf scan
jf scan operates on a compiled artifact that Xray unpacks, then identifies every
embedded library by its hash and metadata, and maps each to known CVEs.
jf scan is not limited to JARs — it works on any packaged artifact: archives
(.zip, .tar.gz), Python wheels, npm tarballs, and so on.
Binary scan for a Java project
In this case the JAR produced by mvn clean install is analysed.
Your CI image should have both the jf CLI and mvn installed.
# gitlab-ci.yml — jf-scan-sbom-from-jar
jf-scan-sbom-from-jar:
  variables:
    CICD_XRAY_SCAN_TARGET: "target/<application-name>-0.0.1-SNAPSHOT-jar-with-dependencies.jar"
  stage: security-sca
  image: $CI_REGISTRY_IMAGE/<jf-cli-with-maven-docker-image>:latest
  script:
    - !reference [.jfrog-configure, script]

    # Compile and package the fat JAR first
    - mvn clean install

    # Scan the compiled artifact and emit a CycloneDX SBOM
    - jf scan $CICD_XRAY_SCAN_TARGET --sbom --format cyclonedx > <application-name>-build.cdx.json

  artifacts:
    paths:
      - <application-name>-build.cdx.json
    expire_in: 1 week # Adjust based on your compliance and storage requirements
For the sake of the example, this job runs mvn clean install inline.
In production, consider splitting the compilation into a dedicated earlier job and passing the JAR forward as a pipeline artifact to the scan job.
The current pipeline stores SBOMs as GitLab CI job artifacts, which is a valid starting point. For long-term retention and governance, consider also uploading SBOMs to Artifactory.
Container analysis with jf docker scan
jf docker scan analyses container images by unpacking their layers and identifying
all embedded libraries and OS packages. Xray then maps these components to known CVEs
and enriches the output with SBOM data.
The OS packages detected in a container image (Ubuntu, Alpine, Debian packages…) significantly increase the component count and vulnerability findings compared to source or binary scans. These OS-level packages are included in the CycloneDX SBOM output alongside application dependencies.
Container scan for a Docker image
The example below assumes the Docker image <application-app>:latest is already
built and available locally on the CI runner, and that your CI image includes
both the jf CLI and Docker client.
# gitlab-ci.yml — jf-docker-scan-sbom
jf-docker-scan-sbom:
  stage: security-sca
  image: $CI_REGISTRY_IMAGE/<jf-cli-with-docker-image>:latest
  script:
    - !reference [.jfrog-configure, script]

    # Optional: build or pull the image if it is not already present
    # - docker build -t <application-app>:latest .
    # - docker pull <application-app>:latest

    # Scan the container image and emit a CycloneDX SBOM
    - jf docker scan <application-app>:latest \
        --sbom --format cyclonedx > <application-app>-docker.cdx.json

  artifacts:
    paths:
      - <application-app>-docker.cdx.json
    expire_in: 1 week # Adjust based on your compliance and storage requirements
Generate SBOMs from the JFrog platform
Xray scans artifacts in indexed repositories, builds, and release bundles and exposes SBOM data directly from the artifact view.
Git repository indexing is not supported in the Software Factory and by the platforms.
Only artifacts associated with the selected resources are scanned for security vulnerabilities and evaluated against your defined policies.
As a project admin:
- From your Project home page, navigate to the Administration tab.
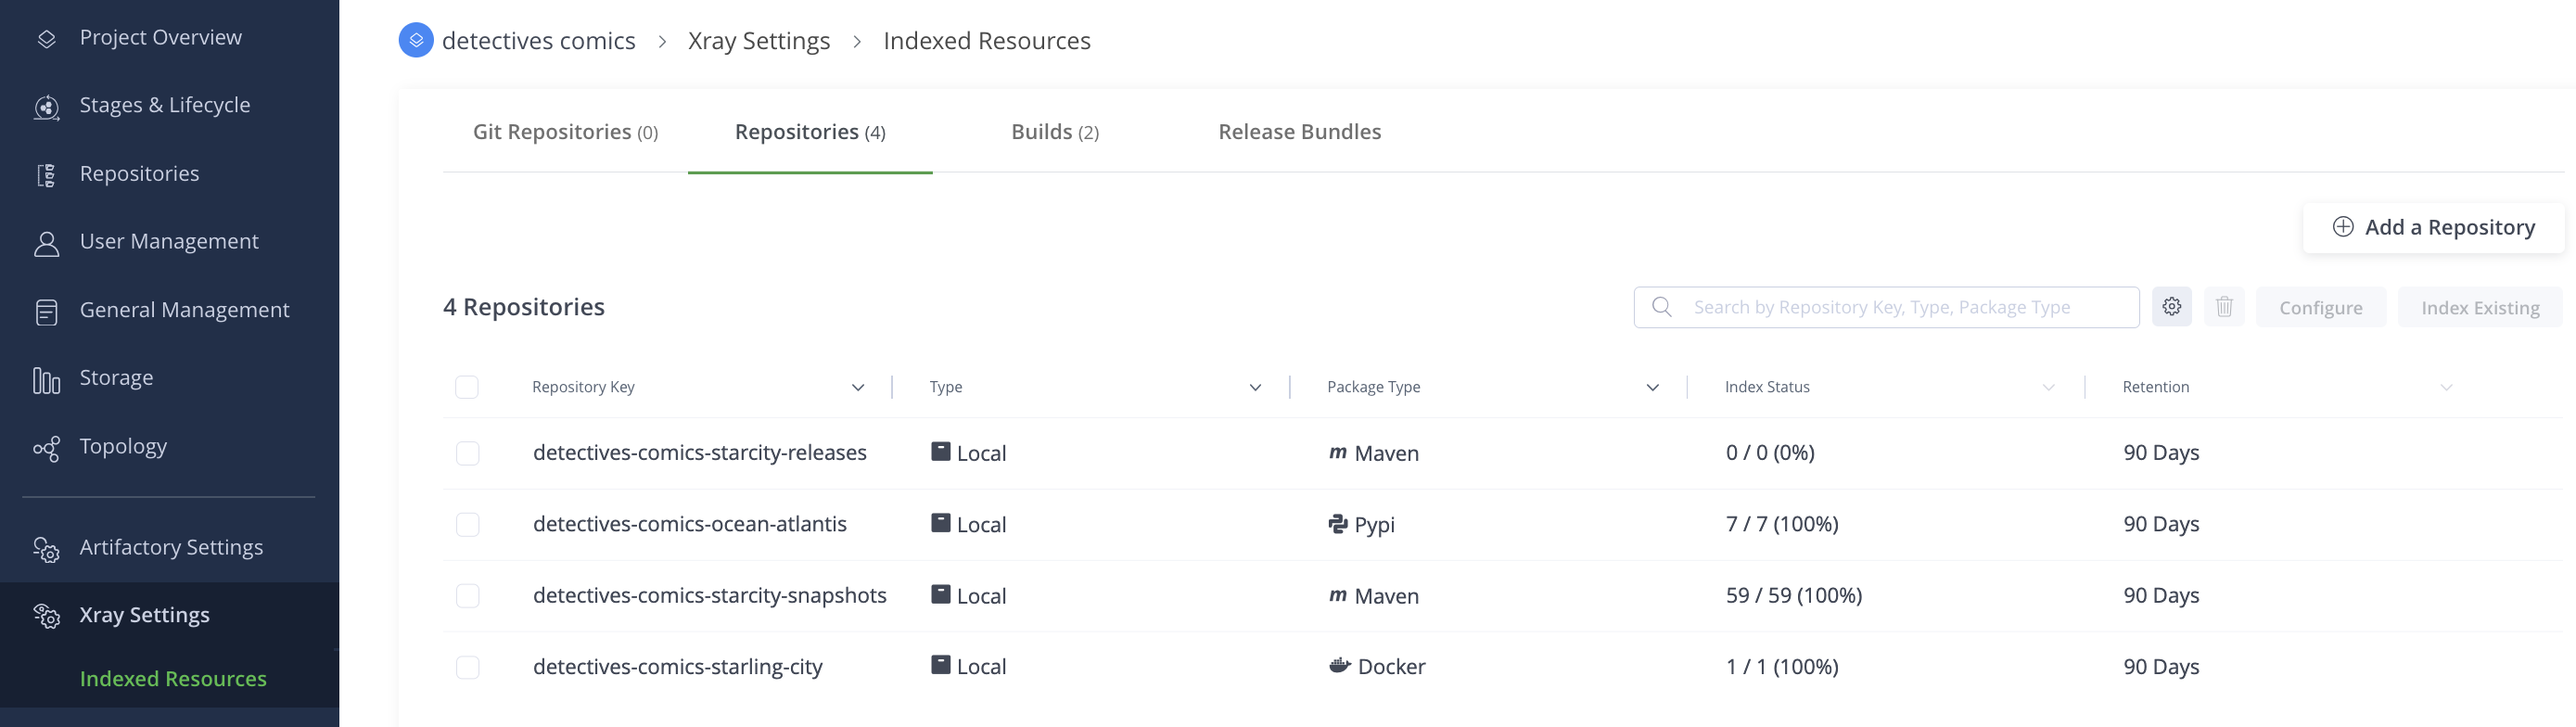
- In the left sidebar, select Xray Settings > Indexed Resources .
- From this screen you can review resources that are already indexed, add or remove resources for indexing, and configure indexing settings.
Add a repository to the index
As a project admin:
- From your Project home page, navigate to the Administration tab.
- In the left sidebar, select Xray Settings > Indexed Resources .
- Click Add a repository.
- In the Available Repositories list, select the repository you want to index. Use the search bar to find a specific repository if needed.
- Click the right arrow button (→) to move the selected repository to the Selected Repositories list.
- Click Save to apply the changes.
Review and configure index settings
As a project admin:
- From your Project home page, navigate to the Administration tab.
- In the left sidebar, select Xray Settings > Indexed Resources .
- Review the status of the indexing in the Index Status column.
- Review the retention period of the scan in the Retention column.
- Select … at the end of a row to configure repository indexing:
- Change the retention period.
- Change the scanning policy to Scan All Artifacts or Scan by Pattern.
The retention period defines how long Xray keeps scan data for each artifact after it is scanned. The default is 90 days and the maximum is 1000 days.
Review a scan of an artifact
Artifacts uploaded before the repository was indexed are not scanned automatically. To scan them, use Index Now (whole repository) or Scan Now (targeted scan) as described in the sections below.
Trigger a targeted scan
- From your Project home page, at the Platform tab, go to Xray > Scans List > Binary Scans .
- Select Scan Now.
- Select Repositories.
- Choose the repository that contains the artifacts you want to scan.
- Optionally narrow the scope by:
- Repository path (folder / sub-folder)
- Name pattern (e.g.
*.jar,*.tgz)
- Click Scan to start the scan.
Xray indexes and scans the selected artifacts and displays their status in the Binary Scans list.
Trigger a scan for an entire repository
As a project admin:
- From your Project home page, navigate to the Administration tab.
- In the left sidebar, select Xray Settings > Indexed Resources .
- Select the Repositories tab.
- Select the repository you want to scan and click … at the end of the row.
- Select Index Now.
Xray indexes and scans all artifacts inside the selected repository.
View vulnerabilities and SBOM information
Once the scan is complete:
- Go to Artifactory → Artifacts.
- Browse to the repository and select the artifact you scanned.
- Open the Xray tab:
- Policy Violations: a summary of policy breaches detected.
- Security Issues: CVEs, severities, and affected components.
- SBOM: most common licenses found and component types.
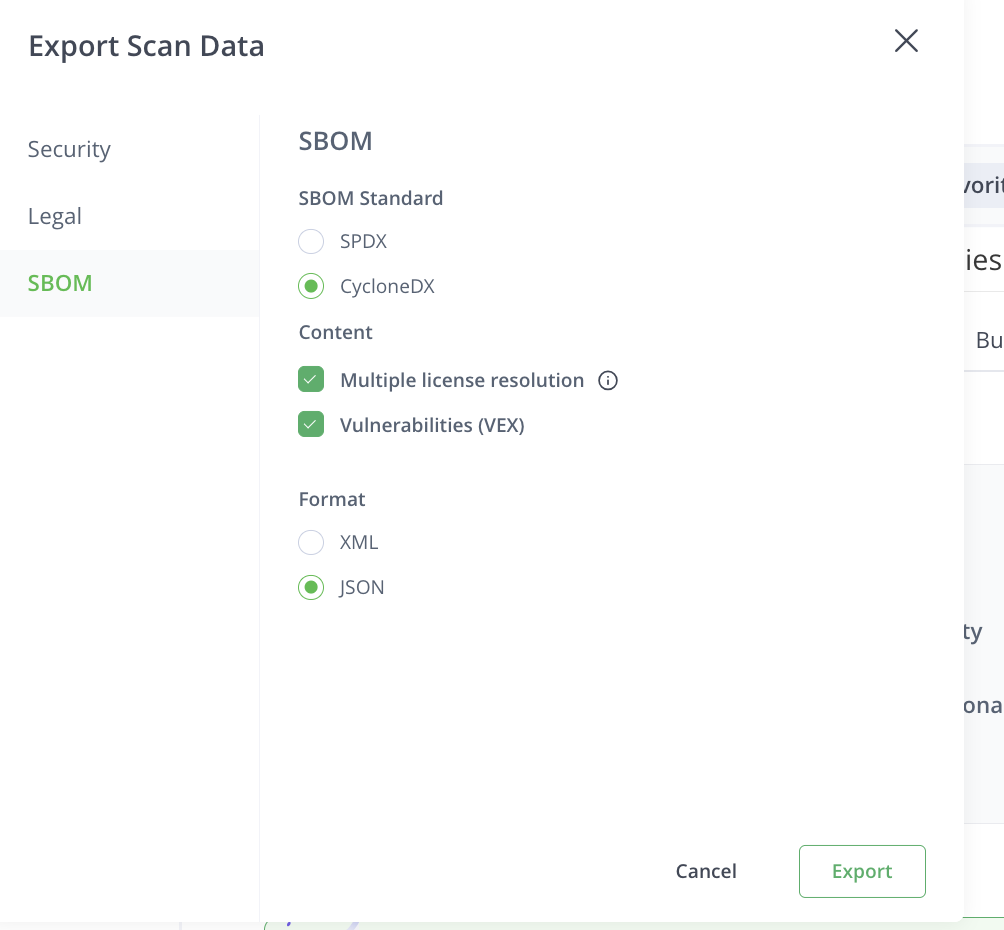
- At the top of the Xray tab, click ….
- Select Export Scan Data.
- Select SBOM on the left, then CycloneDX under SBOM Standard, and JSON under Format.
CLI command reference
The following commands are covered in the CLI section above. For policy enforcement options, see Xray License Scanning .
| Goal | Command |
|---|---|
| SBOM from source (Maven) | jf audit --mvn --sca --sbom --format cyclonedx |
| SBOM from source (Python) | jf audit --pip --sca --sbom --format cyclonedx |
| SBOM from compiled JAR | jf scan ./target/app.jar --sbom --format cyclonedx |
| SBOM from container image | jf docker scan <image>:<tag> --sbom --format cyclonedx |
| Link results with an Xray project | jf audit --mvn --project <project-key> --sbom |
| Fail build on policy violation | jf audit --mvn --fail ¹ |
| Upload SBOM to Artifactory | jf rt upload <file.cdx.json> <repo-path> |
| List configured servers | jf c show |
¹ Requires an active Watch with a Fail Build policy action configured for the project. See Xray License Scanning for setup instructions.