version v7.2.
For up-to-date documentation, see the
latest version.
Xray License Scanning
6 minute read
Overview
Xray analyzes the components in your repositories and builds, detects their licenses using SPDX identifiers, and flags anything that violates your compliance rules.
The workflow follows a clear sequence:

For background on how Xray works and what licenses are, see Xray Page and License Categories .
Prerequisites
Before you start, make sure you have:
- Access to a JFrog Platform instance with Xray enabled
- A role with permissions to manage policies and watches in your Project
- JFrog CLI installed and configured (required for CLI commands)
- Access to your CI/CD pipeline configuration (optional, for pipeline enforcement)
Define your license policy
Xray enforces license compliance through policies and watches. See License Policies and Watches for a full explanation of how they work together.
Create a license policy
- Navigate to Xray > Policies and Select New Policy.
- Set the Policy Type to License.
- Add one (or more rules) by choosing Permission type:
- Allowed licenses : from the list or by choosing categories
- Banned Licenses : from the list or by choosing categories
- Configure the level of the violation : Low, Medium, High and Critical
- (Optional) Configure the operational action: Blocking
- Blocking actions : fail build, block download …
Notifications: send email, create Jira ticket.
- Save the policy.
Notification actions (email, Jira) are not currently supported
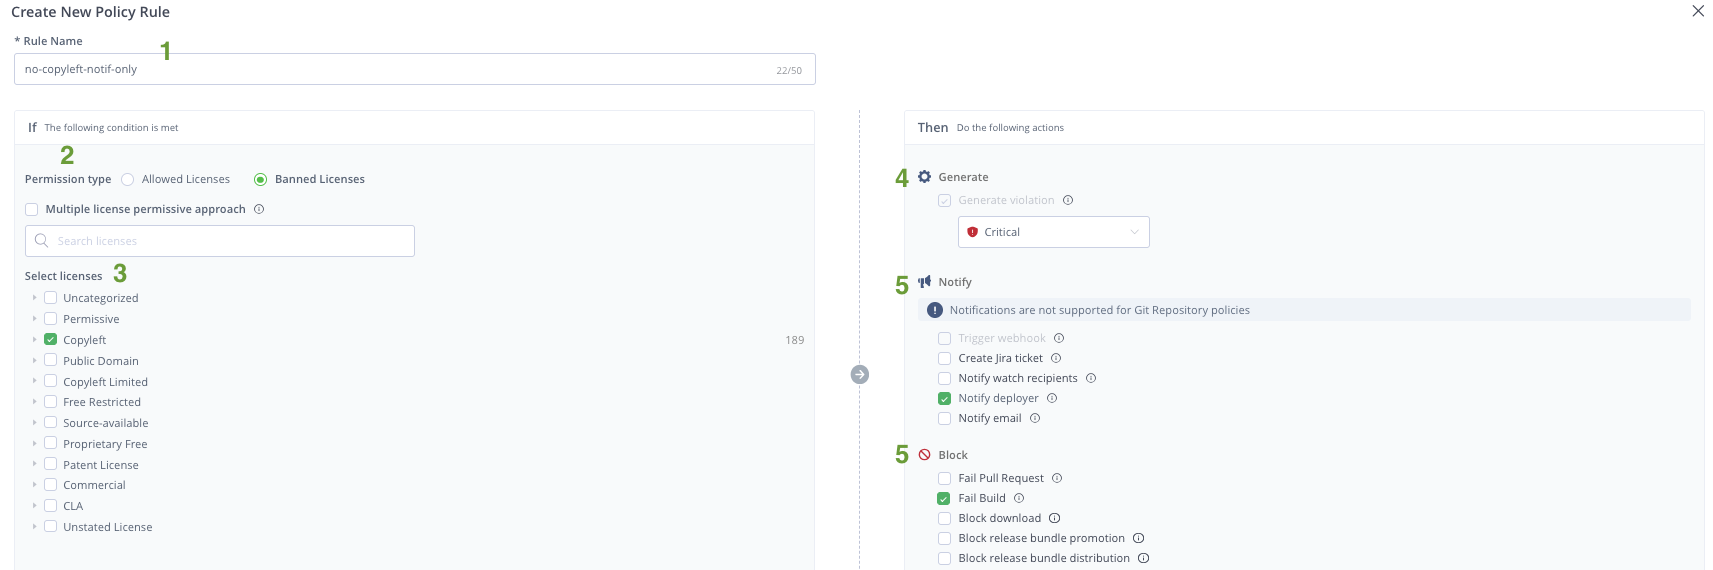
Attach the policy to a Watch
- Navigate to Xray → Watches and create (or open an existing one).
- Enter a Name and a Description for the watch if necessary.
- Under Manage Resources, choose what to monitor: repositories, builds, or bundles.
- In the resource selection dialog, drag and drop resources to include in the watch then select Save.
- Under Assigned Policies, select + Manage Policies and attach the license policy created.
- Select Create to save the watch and confirm its status shows Enabled.
Ensure resources are indexed
Xray only scans resources that have been indexed. See Xray Indexing for details on how indexing works.
To enable indexing on a repository:
- Navigate to Administration → Xray Settings → Indexed Resources.
- Verify the repositories or builds you want Xray to monitor are listed here.
To verify indexing status, go to the same page and confirm the resource shows Indexed in the status column.
Newly uploaded artifacts are indexed automatically going forward.
Run license scans from the UI
Once a repository or build is indexed and a watch is active, Xray scans automatically on new artifact uploads.
To trigger or review a scan manually:
- Navigate to Artifactory > Repositories or Artifactory > Builds .
- Open the relevant artifact or build and select the Xray tab.
- Choose … and then Scan for Violations to run an on‑demand scan or refresh the results.
No additional action is required — violations are surfaced as soon as the watch detects a policy breach.
View the Licenses Composition
Inside your Project, navigate to Xray > On Demand Scanning > Source code scans . Select your scan, then go to the SBOM view:
- Component: list of components
- Version: version number of the component
- License: license type (either found or unknown)
View the Licenses Violations
Inside your Project, navigate to Xray > Watch Violatiions .
- Select a watch from the list
- On the right, select Filters and choose
Licensein Type. Leave the others by default values. - Review the licenses violatios
- Severity
- Impacted Artifact
- Policies
Run license scans with JFrog CLI
Use the CLI to scan during local development or as a step in your CI/CD pipeline.
Configure your connection to your server by setting a server-id, JFrog Artidfactory url, and a token:
jf config add
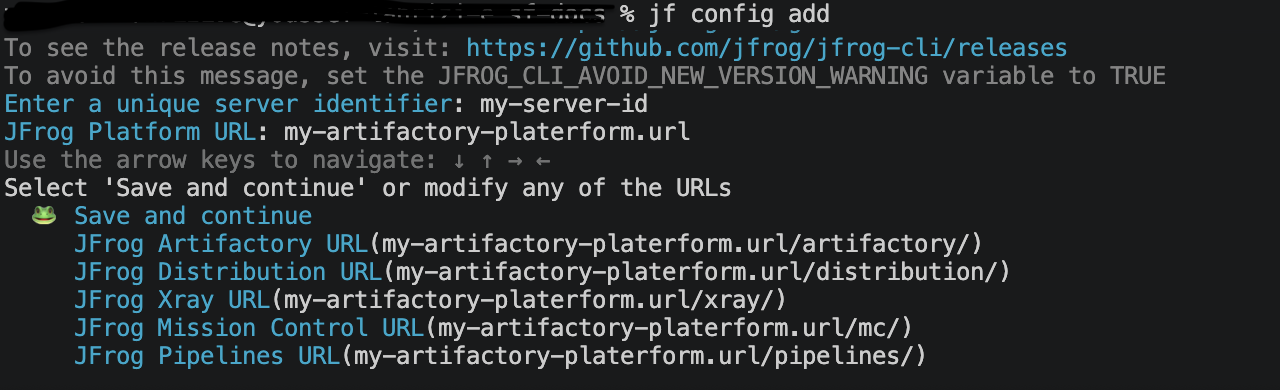
Scan a local project directory:
# Audit a local project — license data is always scanned when Xray is connected.
# --licenses includes detected licenses in the output; omit it to see violations only.
jf audit --licenses --format table > my-project-licenses.txt
Supported values include table, json, simple-json, sarif and cyclonedx
Understand the output
When using --format table with jf audit --licenses:
The first table lists the vulnerabilities discovered. The second table lists each component, its detected license, and the license type.

Typical CI integration pattern
In CI, you usually want the pipeline to fail automatically when a license violation is detected according to your Xray license policies and watches.
A common pattern is:
- Publish a build to Artifactory from your CI job (including build name & number).
- Ensure the build is indexed by Xray , covered by a Watch that has a License Policy attached.
- Run
jf build-scanwith the--failflag to enforce license compliance in the pipeline.
Example: GitLab CI/CD job
license_scan:
  stage: validation
  image: some-image-with-jfrog-cli:latest
  script:
    # Set build name/number (you can adapt this naming to your process)
    - export BUILD_NAME="${CI_PROJECT_NAME}"
    - export BUILD_NUMBER="${CI_PIPELINE_ID}"

    # Run the Xray build scan and fail the job on license violations
    - jf build-scan --fail --project <my-project> "$BUILD_NAME" "$BUILD_NUMBER"
The --fail flag ensures the pipeline exits with a non-zero code on violations,
blocking the build from progressing.
Xray evaluates that build against:
- The Indexed Resources configuration (the build must be indexed).
- All Watches that include this build. (see previous steps for watch )
- The License Policies attached to the watches.(see previous steps for policy ).
Generate license reports
Inside your Project:
- Navigate to Xray > Reports and Select Create Report.
- Select Licenses Compliance and Next.
- Provide a Name
- Choose the scope: repositories, builds, or Release Bundles.
- (Optional) Review if needed the advanced filters
- Select Generate Report
- Wait until the report is ready, by checking the progress bar.
- Select the report
- Select Export
- Choose the file format, the report type and the ouput file name and select *Export.
Manage violations
Drill down into a violation
Select any violation to open the detail panel:
- Component: the artifact or package that carries the license
- License: the detected SPDX identifier (or Unknown if unrecognized)
- Dependency tree: shows whether the component is a direct or transitive dependency, and which top-level artifact pulled it in
- Impacted artifacts: all artifacts in the watched scope that are affected by this component.
Remediation
| Situation | Action |
|---|---|
| License is acceptable but not in your allowlist | Update the policy rule to add the license |
| One-off exception for a specific component | Create an Ignore Rule in Xray for that component/license pair |
| Dependency can be replaced | Update the package version or swap to an alternative with a compatible license |
| Unknown license needs review | Escalate to your legal team; add a custom license mapping in Xray if confirmed |
| Violation is a false positive | Create an Ignore Rule and document the reason |
To create an Ignore Rule:
- open the violation detail
- Select Ignore
- Configure the scope (component, version, or watch) and expiry.