version v7.2.
For up-to-date documentation, see the
latest version.
JFrog Xray Vulnerability Scan
8 minute read
Overview
Xray detects known vulnerabilities (CVEs) in the components of your repositories, builds and release bundles.
It identifies each component, maps it to known vulnerabilities from public and proprietary sources and lets you enforce security policies using policies and watches mechanism.
- For background on how Xray works, see Xray Page .
- For license compliance, see Xray License Scanning .
Prerequisites
Before you start, make sure you have:
- Access to a JFrog Platform instance with Xray enabled
- A dedicated Project.
- A role with Manage Xray Data, Manage Watches & Policies and Manage Reports permission within that project.
- JFrog CLI installed and configured
Create a vulnerability policy
A policy defines what counts as a violation and what action Xray takes when one is found.
Create the policy and add security rules
- From your project homepage, open the Platform tab.
- Navigate to Xray > Watches & Policies > Policies and choose New Policy.
- Provide a Name, set the Policy Type to
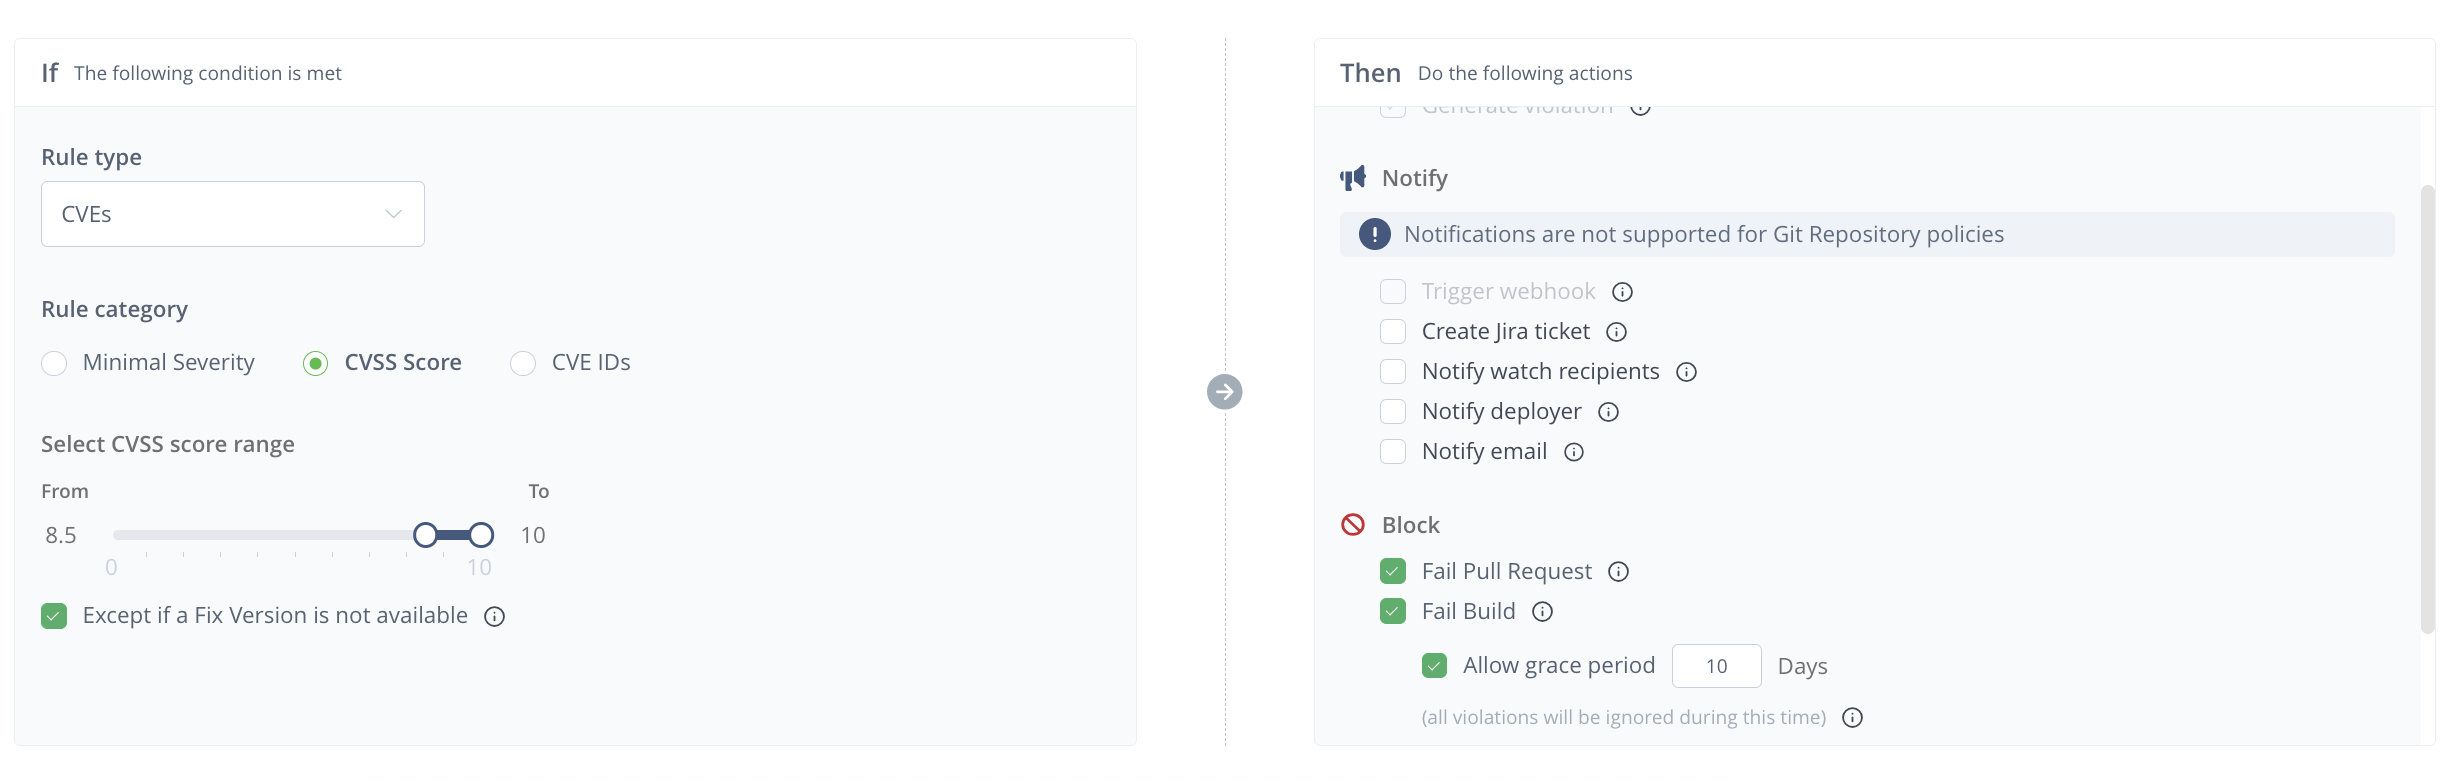
Securitythen select Next >. - Add one or more rules. Provide a rule Name and choose CVEs for Rule Type.
- A security rule can trigger a violation based on Rule Category:
Minimum severity— trigger when a CVE meets or exceeds a chosen severity (Low, Medium, High, or Critical).CVSS score range— trigger when the CVSS score falls within a defined range (for example,7.5to10for high and critical issues).CVE IDs— target one or more known CVEs directly.
- For each rule, configure what Xray does when the rule is triggered:
- Generate Violation — checked by default
- Block —
Fail BuildorBlock download
The notification (Jira or by Mail) is not supported with the Software Factory.
Attach the policy to a Watch
A watch applies the policy to specific resources and triggers scans.
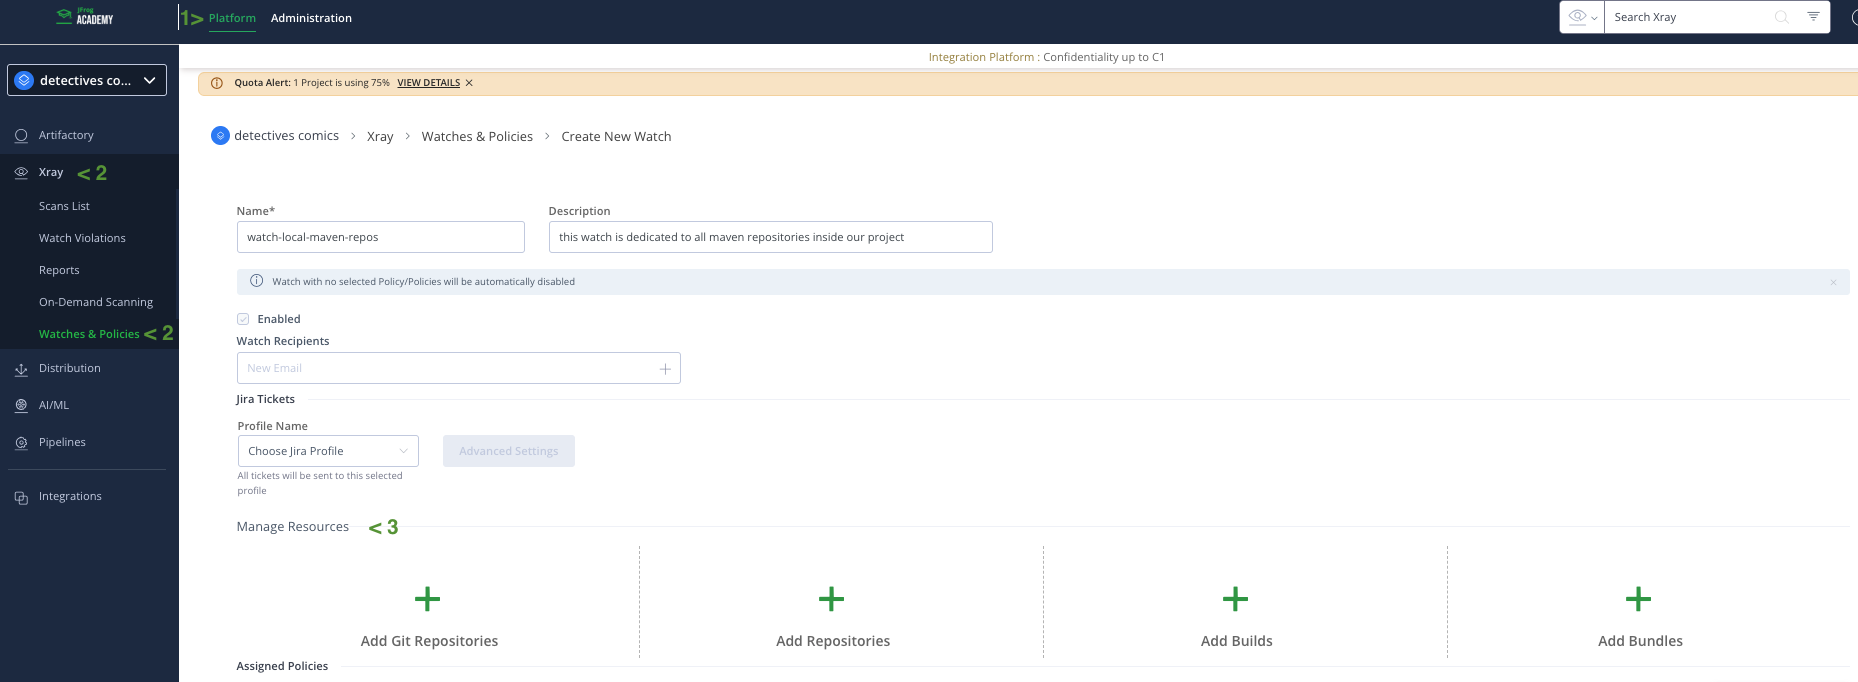
- From your project homepage, open the Platform tab.
- Navigate to Xray > Watches & Policies > Watches and select New Watch.
- Under Manage Resources, select what to monitor:
- Add Repositories,
- Add Builds,
- Add Bundles
- Drag and drop the resources from
AvailabletoSelectedto be included in the watches. - Under Assigned Policies, attach the security policy by selection Manage Policies.
- Save the watch by selecting Create and verify its status shows Enabled.
A watch only scans artifacts when a scan-triggering event occurs, such as a new upload.
Index Resources
Indexing can be configured in the Administration area at instance level or from a project level.
- From your project homepage, open the Administration.
- Navigate to Xrat > Xray Settings > Indexed Resources
- Select a type of resources you want to index between Repositories, Builds or Release Bundles.
- Drag and drop the selected resources from Available table to Selected.
- Save your changes.
After this:
- Xray will start indexing these repositories/builds.
- New uploads to these resources will be scanned automatically and Policies evaluated if a relevant Watch is attached.
Run vulnerability scans
Once a policy and watch are in place and your resources are indexed, you can scan from three entry points depending on where you are in the lifecycle.
Scan locally with JFrog CLI
Use jf audit to detect vulnerabilities in a project before committing, working from the dependency
manifest without building a binary:
jf audit
This returns the components, their detected CVEs, severities, and the fixed version if any.
Scan from the UI
From the JFrog Platform UI, you have:
Automatic scans
Once a resource (repository, build, or bundle) is indexed and a watch is active:- New uploads are scanned automatically.
- Violations appear under Xray > Watch Violations and in the Xray tab for artifacts/builds.
On-demand scans
To rescan existing artifacts or builds:- Open the resource (e.g., in Artifactory > Artifacts or Artifactory > Builds ).
- Select the Xray tab.
- Use Scan for Violations, by using Scan Now (targeted) or Index Now (whole repository) to trigger an immediate scan.
On-demand scans are useful when:
- You’ve just updated a policy with new or different rules.
- New CVEs were published and you want to re-evaluate an existing build or repository.
Review scan results in the UI
This is the core of vulnerability detection: knowing where to look and what each screen shows. For background on what CVEs, CVSS scores, and severity levels mean, see vulnerabilities .
Review Security violation of an Uploaded Artifact
- From your project homepage, in the Platform tab.
- Navigate to Xray > Scan List .
- Select the repository that stores your artifact.
- The screen lists artifacts (and their versions) in your repository, showing the Artifact Name, number of Vulnerabilties, the Scan Status as well as the Last Scan date.
- Select the artifact you want to review.
- In the left-hand menu, under Vulnerabilities under Security Issues.
Review watches results
The main entry point is the project-wide violations list:
- From your project homepage, in the Platform tab.
- Navigate to Xray > Watch Violations .
- Select one of you existing watches.
- Filter on Type for
Securityto display on security vulnerabilities.
This screen lists every violation across the resources covered by your watches. Use the filters at the top to narrow the list:
- Severity — Critical, High, Medium, Low.
- ID
- Impacted Artifact
To inspect a single artifact instead of the whole project, open it in Artifactory > Artifacts , select the artifact, and open the Xray tab.
The build equivalent is under Artifactory > Builds .
Understand the Vulnerabilities Screen
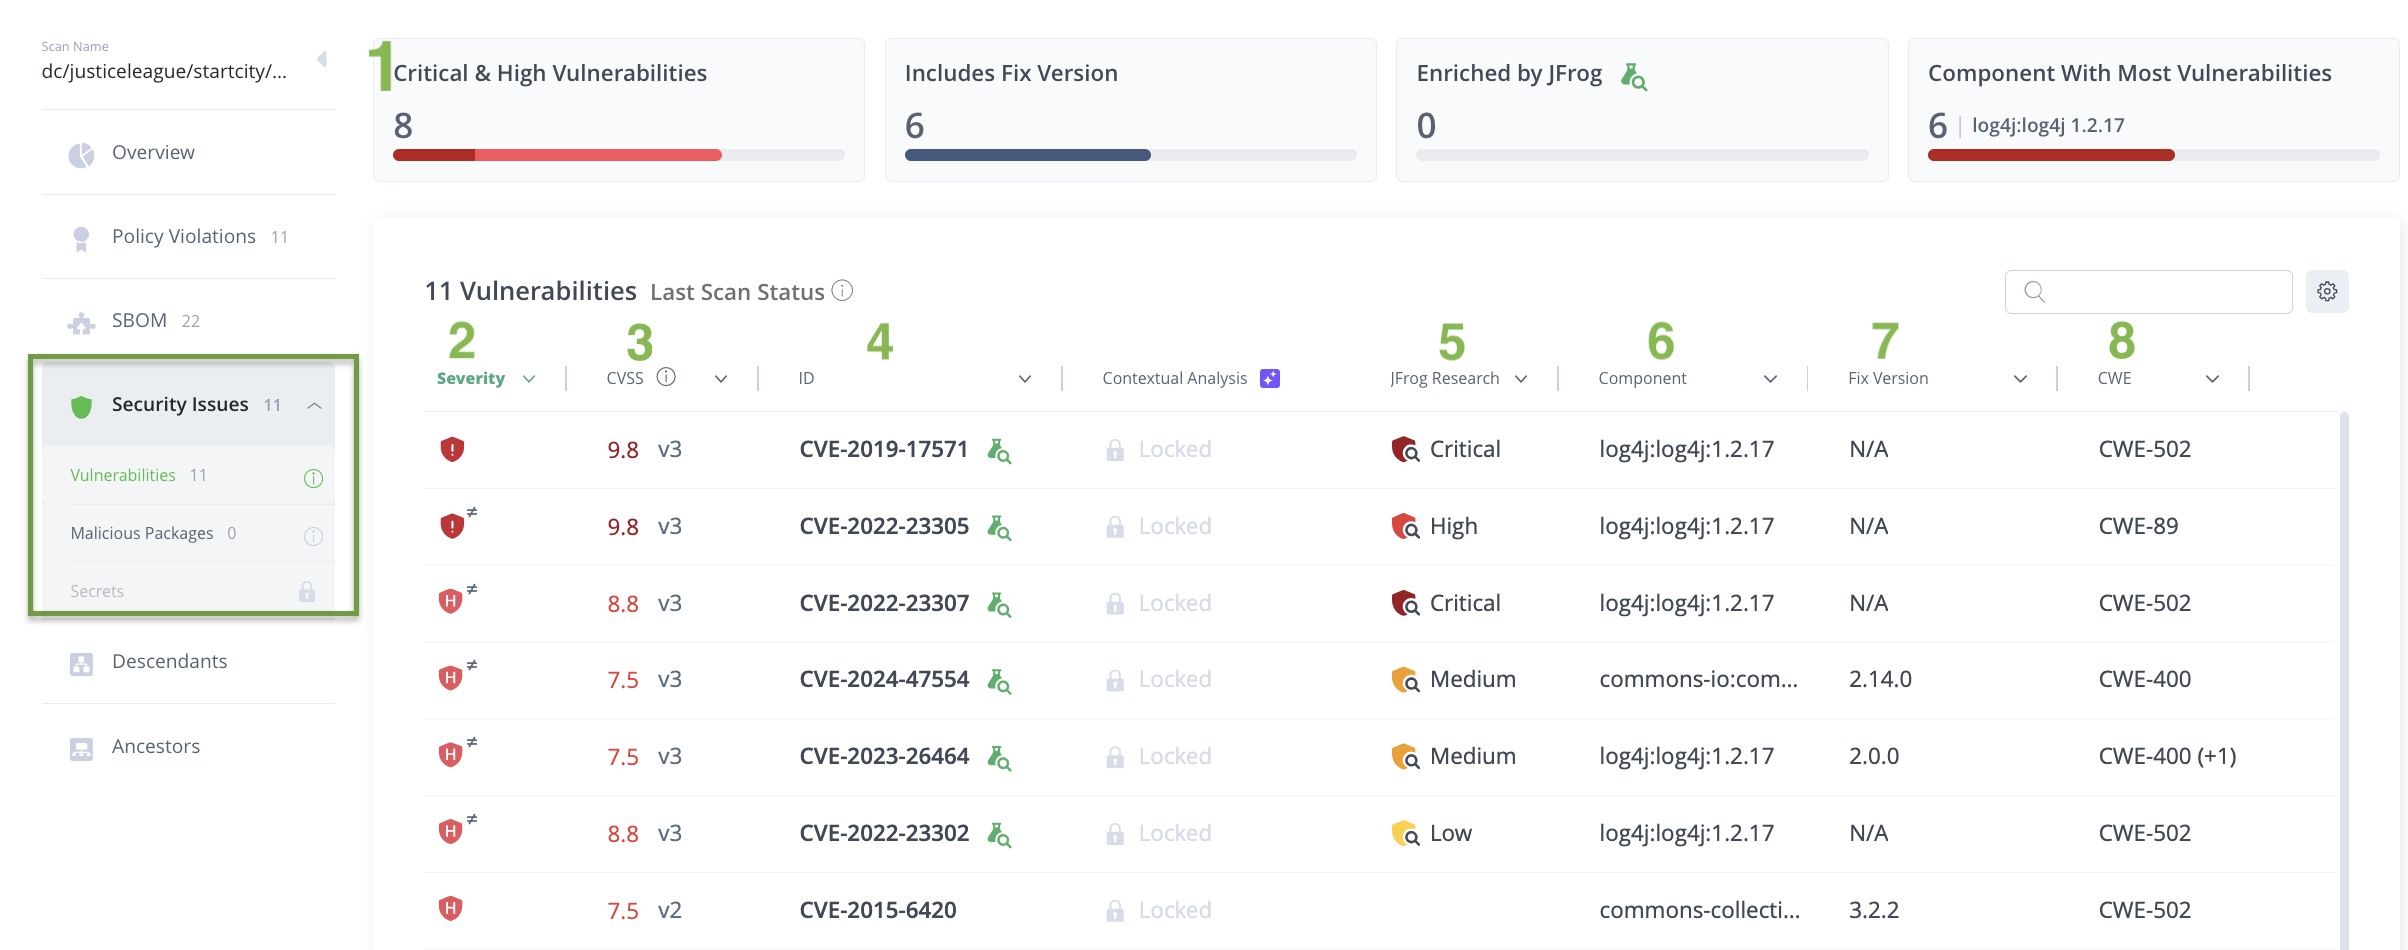
1 - Summary bar
The four cards at the top give an immediate health snapshot of the scanned resource:
- Critical & High Vulnerabilities — the count of findings rated Critical or High severity. The red progress bar shows the proportion relative to total findings.
- Includes Fix Version — the count of CVEs for which Xray knows a fixed version. A high ratio here means most issues are actionable.
- Enriched by JFrog — the count of CVEs that carry a JFrog Research severity
assessment. A value of
0means none of the detected CVEs have been analyzed by JFrog’s Security Research team yet, or that the feature requires a higher subscription tier. - Component With Most Vulnerabilities — the single component carrying the highest number of CVEs, with its count. Use this to identify which dependency to prioritize if you can only fix one thing first.
2 - Severity column
Icon badge : the NVD/CVSS-derived severity, shown as a colored shield: red for Critical, orange-red for High.
A ≠ symbol on the badge means the JFrog Research severity differs from the CVSS severity
3 - CVSS column
Shows the numeric CVSS score and the scoring version used (v2, v3).
A score of 9.8 v3 means the vulnerability scored 9.8 under CVSS version 3.
For background on how CVSS scores are calculated, see vulnerabilities .
4 - CVE ID column
The CVE identifier (for example, CVE-2021-44228).
The green flask and the magnifying glass next to the CVE ID indicates the vulnerability has been enriched with JFrog Research data.
Select the CVE ID to open the full detail panel.
5 - JFrog Research column
JFrog’s own severity rating, produced by their Security Research team.
This can differ from the CVSS severity — note CVE-2022-23302 in the screenshot, which carries a CVSS
score of 8.8 v3 (High) but a JFrog Research severity of Low.
Check this column before deciding how urgently to act on a high CVSS score.
6 - Component column
The name and version of the component that carries the vulnerability (for example,
log4j:log4j 1.2.17).
Note that Multiple CVEs can map to the same component.
7 - Fix Version column
The version that resolves the CVE, if Xray knows one.
N/A means no fix version is currently recorded, either no patch exists yet or because Xray does
not have that information.
A value (for example, 2.14.0) means upgrading the component to at least that version will resolve
the CVE.
8 - CWE column
The [Common Weakness Enumeration] identifier categorizing the type of vulnerability
(for example, CWE-502 for deserialization of untrusted data).
Multiple CWEs across components may indicate a broader weakness in your dependency set.
Step 4 – Triage and prioritize
With results in hand, prioritize using the signals from Step 3:
- Filter by severity to surface Critical and High findings first.
- Apply CVSS thresholds to separate build-blocking issues from informational ones.
- Check JFrog Research severity for findings where the CVSS score and real-world risk diverge.
For findings you decide not to act on — false positives, not-applicable CVEs, or accepted risks — you can create an Ignore Rule scoped to the component, CVE, or watch, ideally with an expiry date and a documented reason. The Ignore Rule mechanics are identical to those for license violations; see Xray License Scanning for details.
Remediation (upgrading or replacing components, applying fixes) is out of scope for this page, which focuses on detection and understanding. Triage decisions here feed into your remediation process.
Step 5 – Generate vulnerability reports
Xray’s security-focused report is the Vulnerabilities report, distinct from the Legal report used for license compliance (see Xray License Scanning ).
- Inside your Project, navigate to Xray > Reports and select Create Report.
- Select Vulnerabilities and then Next.
- Choose the scope: repositories, builds, or release bundles and select Next.
- Choose a Schedule,a list of recipients in Share report, then select Next.
- Provide a Name of the report, then select Create.
SMTP server configuration use to send those notification is not part of the standard Software Factory and are not officially supported.
Some platforms may have enabled it independently, if so, the feature will work as expected. Contact your platform team to verify whether it is available in your environment.