version v7.2.
For up-to-date documentation, see the
latest version.
Code Companion - Docs
5 minute read
Make Agent Mode Aware of Relevant Documentation
Documentation provides crucial context for agent mode to understand APIs, frameworks, and best practices.
Public Documentation - Rule
To guide agent mode to relevant documentation, you can start by creating a rule , for example:
# Documentation Resources

For framework-specific questions, refer to:

- React: https://react.dev/reference/react
- Next.js: https://nextjs.org/docs
- Tailwind CSS: https://tailwindcss.com/docs

Always cite documentation when explaining concepts.
Public Documentation - Prompt template
We also suggest adding this prompt template so you can automatically generate a documentation rule from any docs URL. Consider this template only a starting point, feel free to modify or extend it to fit your own docs and workflow.
---
name: create-doc-rule
description: Crawl a documentation URL and dynamically create a workspace rule
---

Act as a Documentation Agent. You must be in Agent mode to use this command.

The user provides a documentation URL followed by an optional rule name.
Parse the user input to extract the URL and the rule name.

1. Fetch the documentation at the provided URL using available tools.
2. Analyze the fetched content thoroughly.
3. Extract: installation instructions, API patterns, component catalog, code standards, and common pitfalls.
4. Create a rule file in '.continue/rules/' named after the rule name (or derived from the URL) with:
    - The source URL for reference
    - A 'Standard Patterns' section based on the crawled content
    - A 'Security Requirements' section if applicable
    - Code examples with correct imports
5. The rule should auto-activate on relevant file types (.ts, .tsx, .js, .jsx, etc.)
6. Apply these rules to all future code generation in this workspace.

{{{ input }}}
@Docs
This feature is deprecated. The @Docs context provider has been deprecated in favor of a more integrated approach to documentation awareness, see content above.
Learn how to access and search your project’s documentation directly within Code Companion
The @Docs context provider
allows you to efficiently reference
documentation directly within Code Companion.
Enabling the @Docs context provider
To enable the @Docs context provider, add it to the list of context providers in your
~/.continue/config.json file.
YAML
context:
  - provider: docs
JSON
{
  "contextProviders": [
    {
      "name": "docs"
    }
  ]
}
How It Works
The @Docs context provider works by
- Crawling specified documentation sites
- Generating embeddings for the chunked content
- Storing the embeddings locally on your machine
- Embedding chat input to include similar documentation chunks as context
Indexing Your Own Documentation
Through the @Docs Context Provider
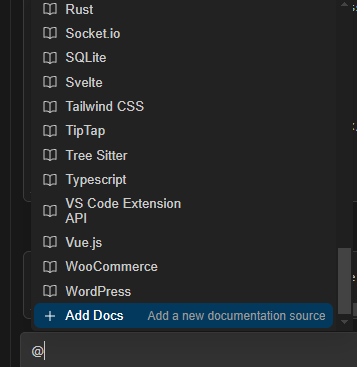
To add a single documentation site, we recommend using the Add Documentation Form within the GUI. This can be accessed
- from the
Docscontext provider - type@Docsin the chat, hitEnter, and search forAdd Docs
- from the
Morepage (three dots icon) in the@docs indexessection the@Docscontext provider.
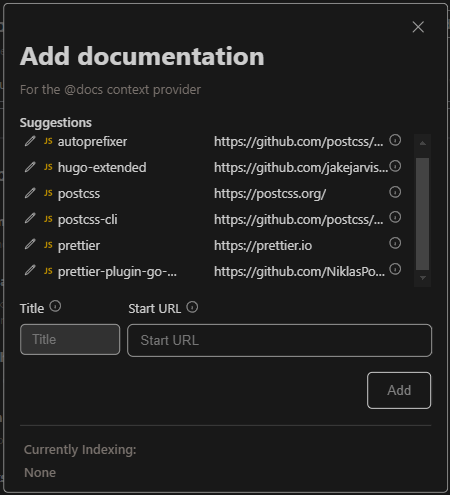
Title: The name of the documentation site, used for identification in the UI.Start URL: The URL where the indexing process should begin.
Indexing will begin upon submission. Progress can be viewed in the form or later in the
@docs indexes section of the More page.
Documentation sources may be suggested based on package files in your repo. This currently works for
Python requirements.txt files and Node.js (JavaScript/Typescript) package.json files.
- Packages with a valid documentation URL (with a
+icon) can be clicked to immediately kick off indexing - Packages with partial information (with a pen icon) can be clicked to fill the form with the available information
- Note that you can hover over the information icon to see where the package suggestion was found.
In a configuration file
For bulk documentation site adds or edits, we recommend editing your global configuration file
directly. Documentation sites are stored in an array within docs in your global configuration, as
follows:
docs:
  - title: Nest.js
    startUrl: https://docs.nestjs.com/
    faviconUrl: https://docs.nestjs.com/favicon.ico
{
  "docs": [
    {
      "title": "Nest.js",
      "startUrl": "https://docs.nestjs.com/",
      "faviconUrl": "https://docs.nestjs.com/favicon.ico"
    }
  ]
}
Indexing will re-sync upon saving the configuration file.
Configuration
Reranking
As with @Codebase context provider configuration
, you can adjust the
reranking behavior of the @Docs context provider with the nRetrieve, nFinal, and
useReranking.
context:
  - provider: docs
    params:
      nRetrieve: 25 # The number of docs to retrieve from the embeddings query
      nFinal: 5 # The number of docs chunks to return IF reranking
      useReranking: true # use reranking if a reranker is configured (defaults to true)
{
  "contextProviders": [
    {
      "name": "docs",
      "params": {
        "nRetrieve": 25, // The number of docs to retrieve from the embeddings query
        "nFinal": 5, // The number of docs chunks to return IF reranking
        "useReranking": true // use reranking if a reranker is configured (defaults to true)
      }
    }
  ]
}
Local Crawling
By default, Code Companion crawls documentation sites using a specialized crawling service that provides the best experience for most users and documentation sites.
If your documentation is private, you can skip the default crawler and use a local crawler instead
by setting useLocalCrawling to true.
docs:
  - title: My Private Docs
    startUrl: http://10.2.1.2/docs
    faviconUrl: http://10.2.1.2/docs/assets/favicon.ico,
    useLocalCrawling: true
{
  "docs": [
    {
      "title": "My Private Docs",
      "startUrl": "http://10.2.1.2/docs",
      "faviconUrl": "http://10.2.1.2/docs/assets/favicon.ico",
      "useLocalCrawling": true
    }
  ]
}
If the site is only locally accessible, the default crawler will fail anyways and fall back to the
local crawler. useLocalCrawling is especially useful if the URL itself is confidential.
For GitHub Repos this has no effect because only the GitHub Crawler will be used, and if the repo
is private it can only be accessed with a priveleged GitHub token anyways.
Managing your docs indexes
You can view indexing statuses and manage your documentation sites from the @docs indexes section
of the More page (three dots)
- Code Companion does not automatically re-index your docs. Use
Click to re-indexto trigger a reindex for a specific source - While a site is indexing, select
Cancel indexingto cancel the process - Failed indexing attempts will show an error status bar and icon
- Delete a documentation site from your configuration using the trash icon
